
Building the sound.
The Rig tab is where your signal chain lives: blocks you add and drag around, a NAM amp profile at the heart of it, a cab impulse response after it, and a master section everything sums into. This page covers all of it — up to four rigs, four parallel chains inside each one, and the presets that recall the lot.
02.1The blocks palette
A chain starts empty and you fill it. Tap the dashed ADD chip at the end of a chain and the palette opens, grouped into sections. Pick a block and it drops into the chain at that point — and its editor opens straight away, so you land on the knobs rather than on an untouched chip.
| Section | Blocks |
|---|---|
| Amp & Cab | Amplifier, Cabinet |
| Delay & Reverb | Delay, Freeze, Reverb |
| Drive | Drive, Lo-fi, Saturator |
| Dynamics | Compressor, De-Esser, Gate, Limiter, Multiband, Swell, Transient, Vocal |
| EQ & Filter | Equalizer, Wah |
| Modulation | Chorus, Doubler, Ensemble, Flanger, Phaser, Rotary, Slicer, Tremolo |
| Pitch | 12-string, Autotune, Harmony, Octaver, Pitch, Synth, Vocoder |
| Utility | FB Guard, FX Loop, Send, Volume |
| Plugins | the AU Plugins submenu on iOS, the installed AAP effects on Android |
The amp and its cab come first; every other section, and the blocks inside it, is in alphabetical order. A block that has presets opens a submenu instead of dropping straight in: Default settings, the factory and saved presets for that block, and under From rig presets the same block lifted out of a rig preset — the drive from one rig, the delay from another.
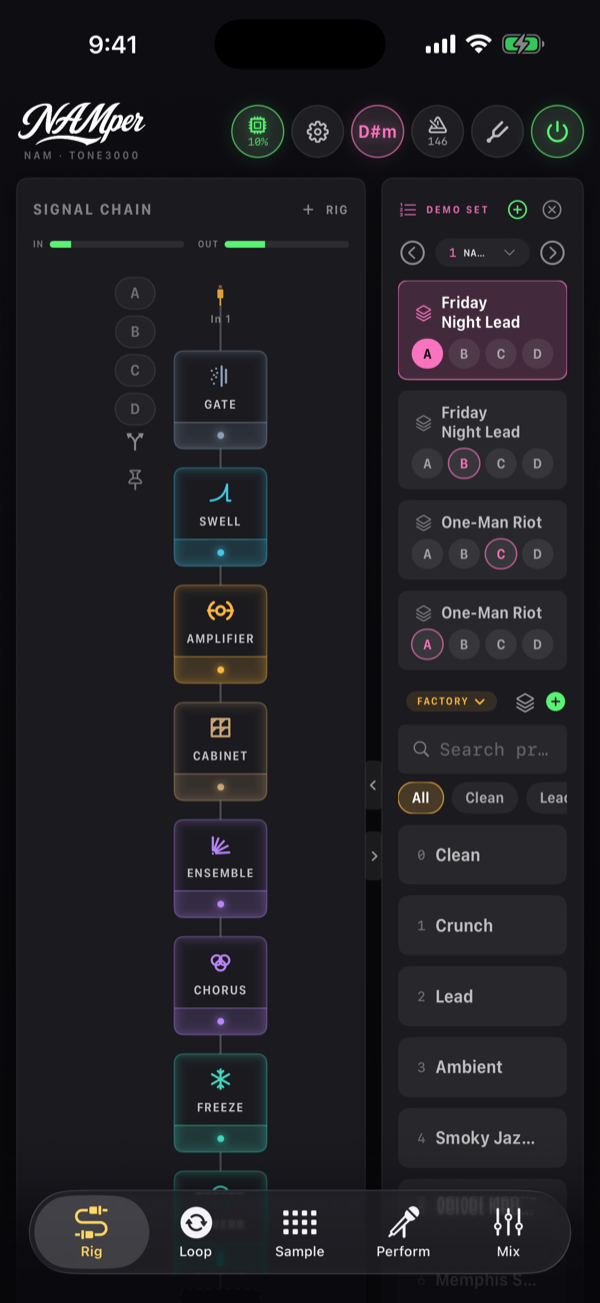
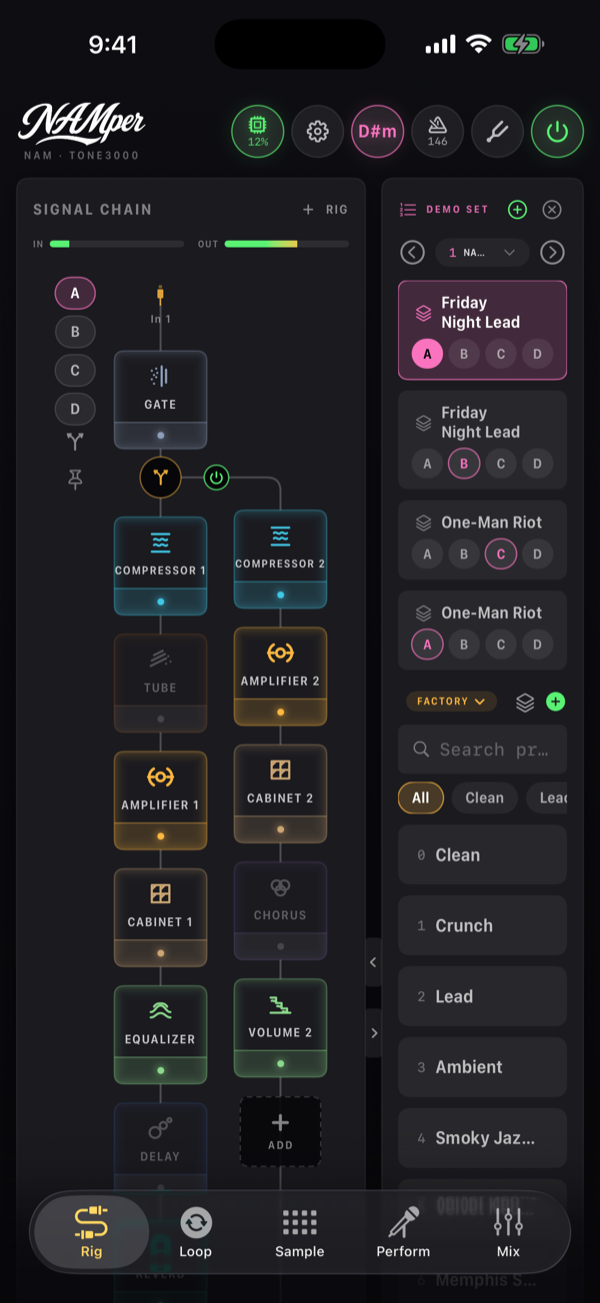
Nothing stops you adding the same block twice. Duplicates are numbered as they arrive — GATE 1, GATE 2 — and block names are always drawn in capitals on the chips. Two drives in a row, a gate at the front and another after the amp: all fine.
Working with a block
| Action | How |
|---|---|
| Bypass | Tap the footswitch strip along the foot of the chip — the LED sits in it, and the whole strip is the target, because this is the control you hit mid-song. The footswitch inside the block sheet does the same, as does long-press → Enable / Bypass |
| Open the editor | Tap the block chip |
| Reorder | Hold the chip until it lifts, then drag: an insertion mark shows where it will land, and it can cross into another chain or another rig. Or long-press → Move left / Move right for a one-step move |
| Remove | Long-press → Remove |
| Reset a knob | Double-tap it |
| MIDI-learn a control | Long-press any knob or chip row → MIDI Learn “<label>”. The control outlines itself and shows MOVE A MIDI CONTROL…; Cancel learn backs out. Once the control has a binding, the same menu offers Remove MIDI binding |
A block that has no parameters of its own says so plainly when you open it: Nothing to tweak here. That is the block working normally, not a loading state.
NAMper has no copy or duplicate action for blocks, anywhere. To get a second block with the same settings, add a fresh one and dial it in. To reuse a whole chain, save it as a preset and build the next rig from that preset instead.
The newer blocks
Twelve blocks joined the palette most recently. What each one is for, in a sentence or two:
| Block | What it does |
|---|---|
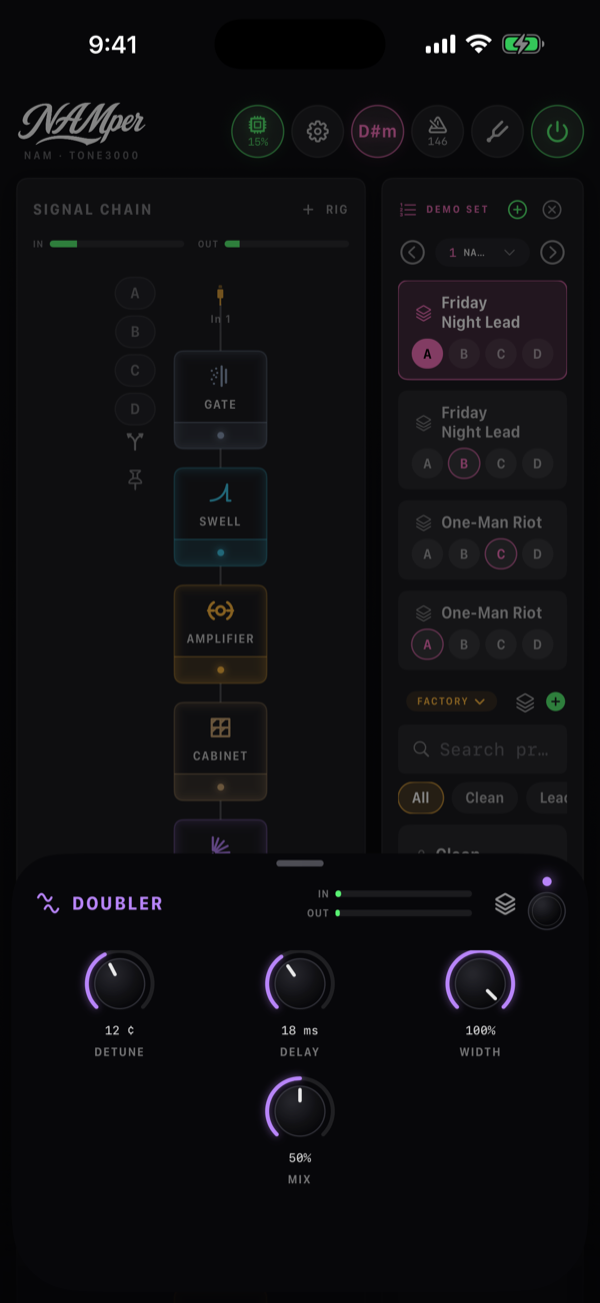
| Doubler | One take heard as two players: a copy a few cents flat and one as many sharp, each a little late, panned out to the sides with the dry in the middle. Nothing moves, so it is not a chorus. Detune, Delay, Width, Mix. |
| Swell | The violin swell without a volume pedal: every new note fades in over the Attack time. Sens decides how hard a pick must be to count as a new note, Depth where the fade starts. |
| Lo-fi | Four ways to wreck a signal on its type chips — Ring mod, Crusher, Telephone and Megaphone — each with its own knobs and a Mix. |
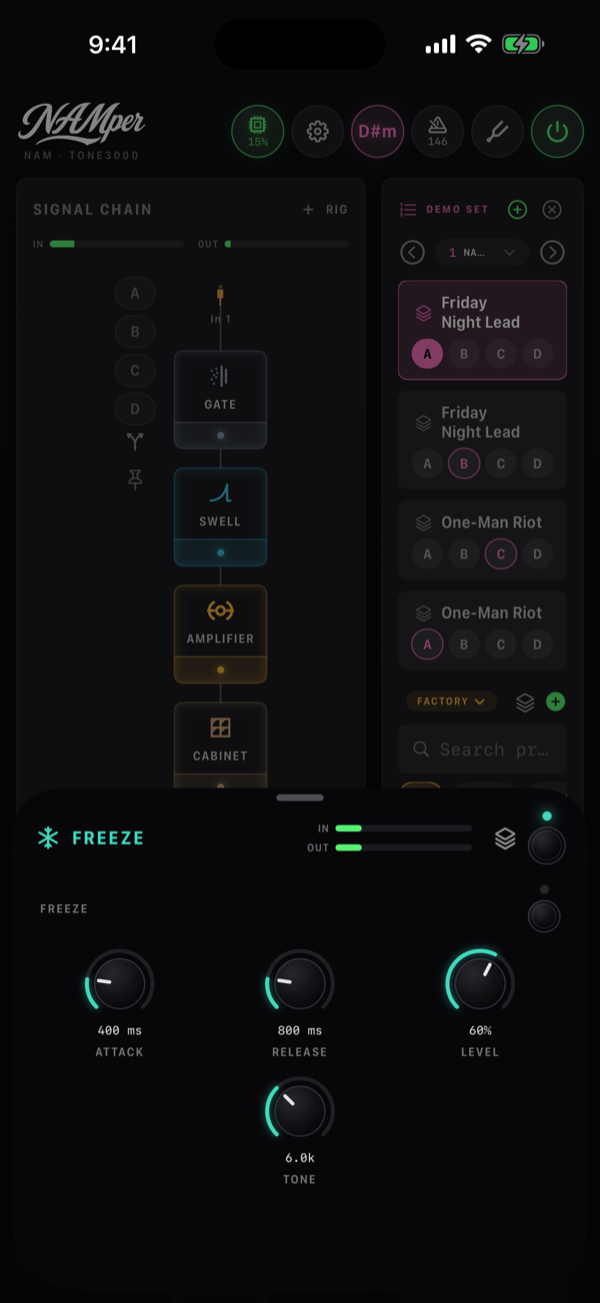
| Freeze | A note held for ever: switch Freeze on (a footswitch, a MIDI button) and the last quarter second becomes an endless wash under the dry while you play on top. Attack, Release, Level, Tone. Bypassed, it stops: the held sound fades out in 10 ms rather than ringing on. |
| Transient | The pick and the ring of a note as two knobs, with no threshold: Attack pushes the pick up or softens it, Sustain lifts the ring or shortens it. |
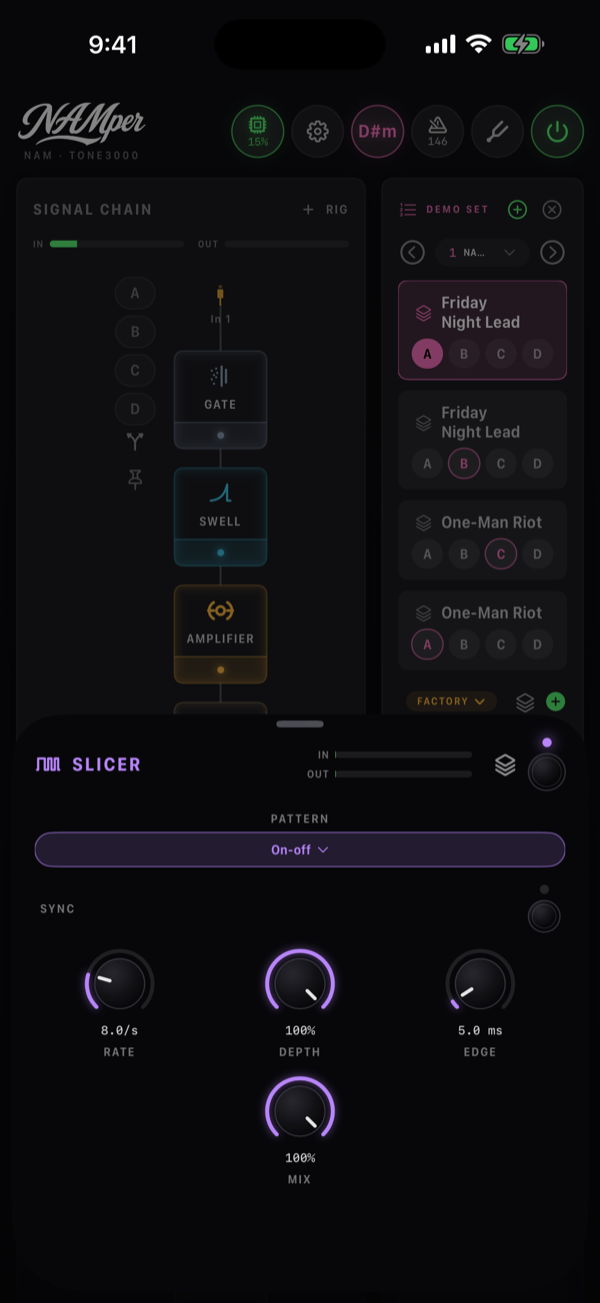
| Slicer | A gate that keeps time: sixteen steps, open or shut by the Pattern. Sync takes the step from the set tempo; Depth is how shut a step is, Edge how fast the gate moves. |
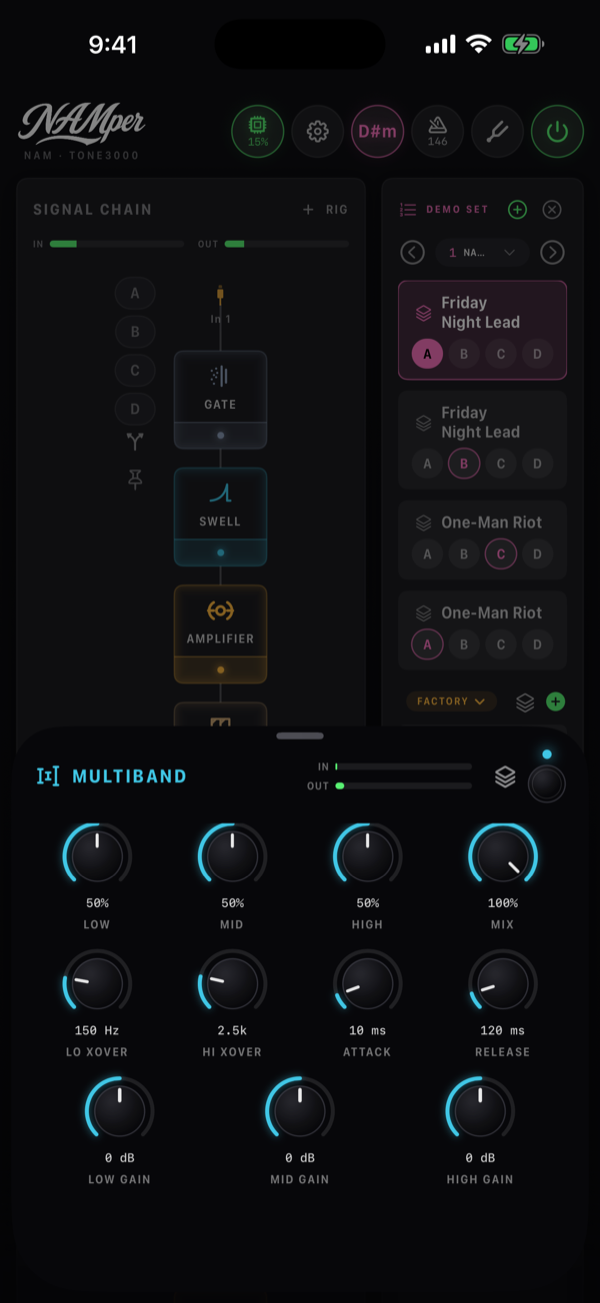
| Multiband | Three bands split at Lo XOver and Hi XOver, each compressed behind one knob — Low, Mid, High — with a gain per band and shared Attack and Release. It evens the boom without pumping the top: a bass, an acoustic, a whole mix. |
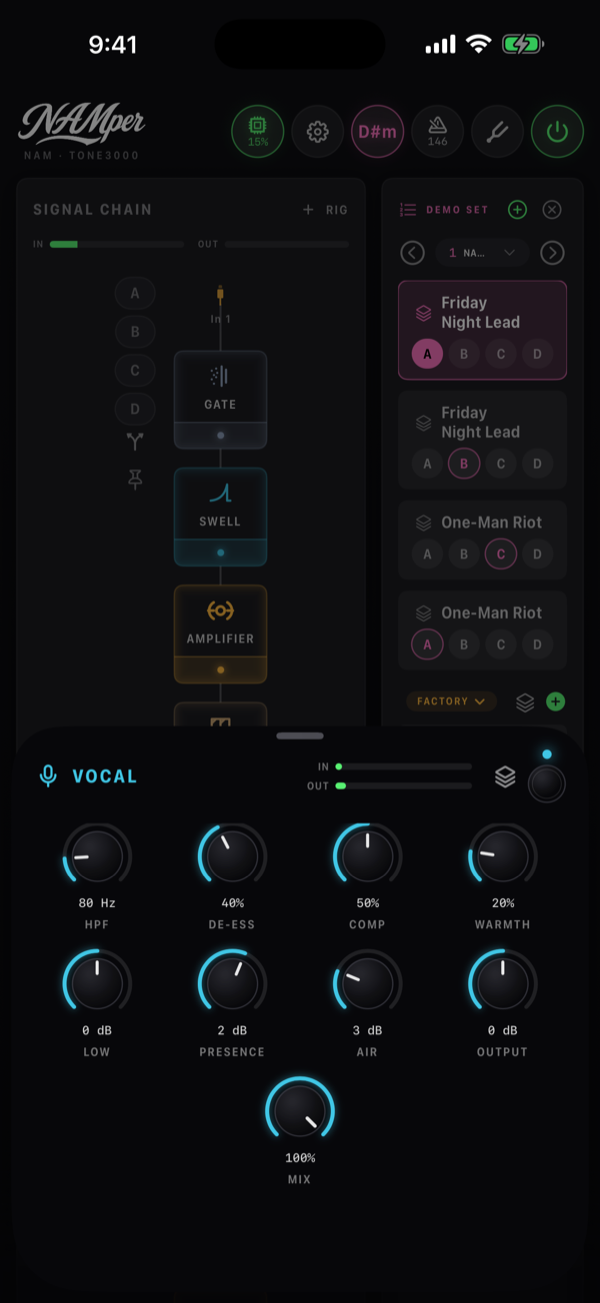
| Vocal | A voice's channel strip in the order a studio runs it: HPF, De-ess, Comp, Low, Presence, Air, Warmth and Output. |
| 12-string | The courses doubled: an octave string for what lies below Split and a unison string a few cents sharp over the whole. The octave string comes in some 40 ms after the pick. Octave, Unison, Detune, Tone. |
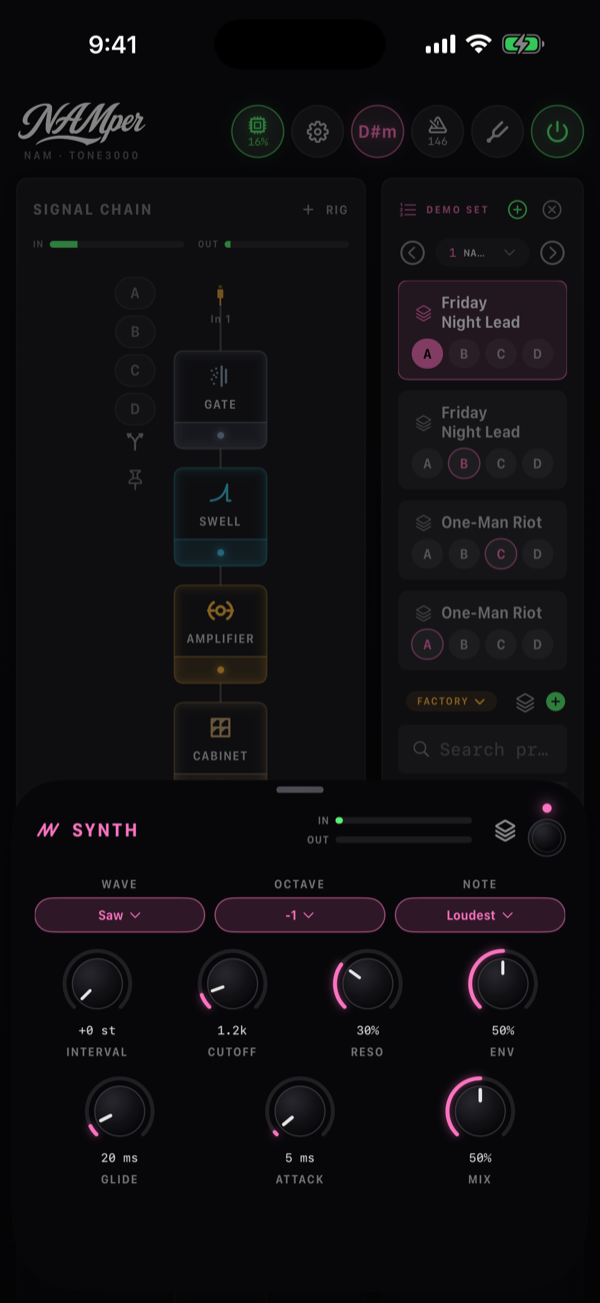
| Synth | A monophonic synth that follows the string: a Wave through a ladder filter (Cutoff, Reso, Env), moved by Octave and Interval. Note picks the Loudest string or the Lowest, so a synth bass under chords stays on the root. |
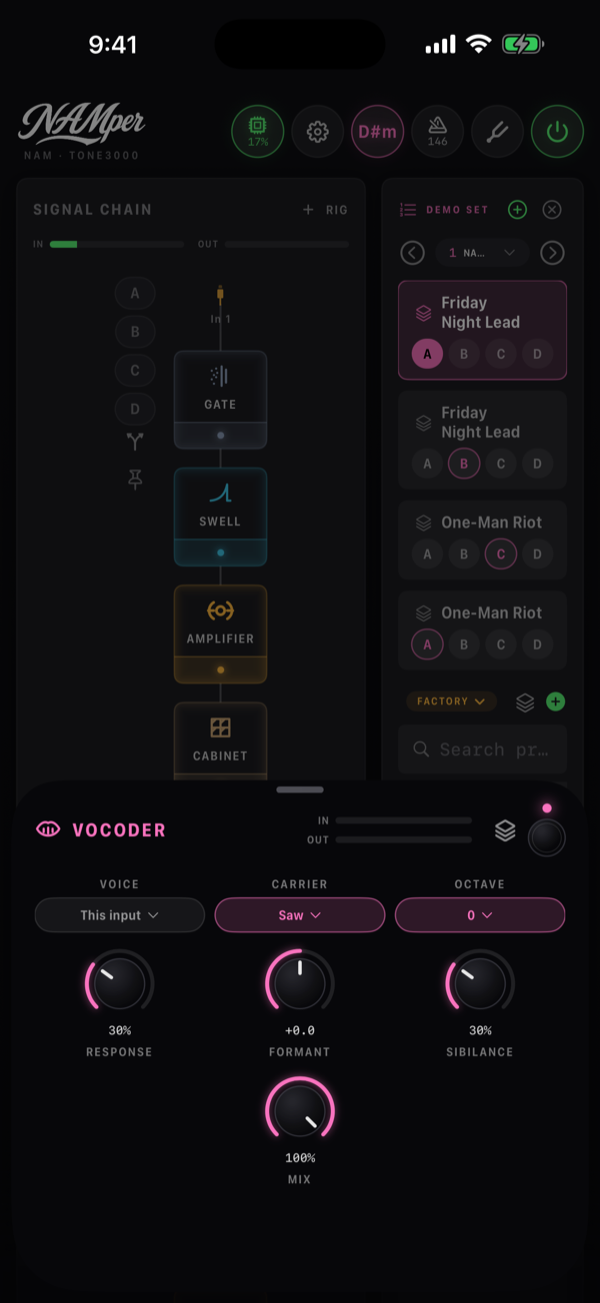
| Vocoder | Sixteen bands put a voice's vowels on another sound. With Voice on This input the block sits on the vocal and plays its own Carrier — the robot; pointed at another rig it sits on the guitar and takes the voice from that rig — the talkbox. Formant, Response, Sibilance, Octave. |
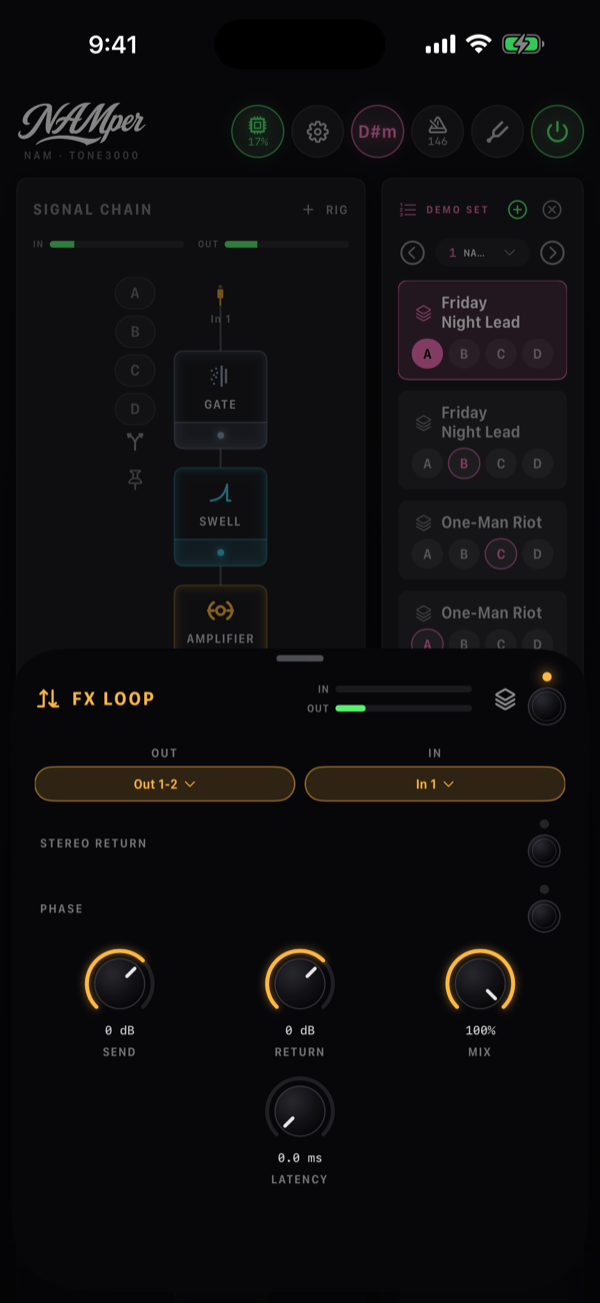
| FX Loop | Outboard gear in the chain: the block sends to one of the interface's output pairs (Out) and takes the return on one of its inputs (In). Send and Return trim the two sides, Stereo return reads two inputs, Phase flips the return. For a parallel loop (a Mix under 100 %) set Latency to the interface's round trip so the dry does not hollow out. |
02.2Models inside blocks
Several blocks are really a family of pedals or circuits behind one chip. Open the block and the row of chips at the top picks the flavour — the knobs stay the same, the character changes.
| Block | Chip row | Choices |
|---|---|---|
| Gate | Model | Classic, Smart, 3-Band, Denoise |
| Compressor | Model · Sidechain | VCA, Opto, FET, Pedal · sidechain OFF, IN 1…IN 4, SMP |
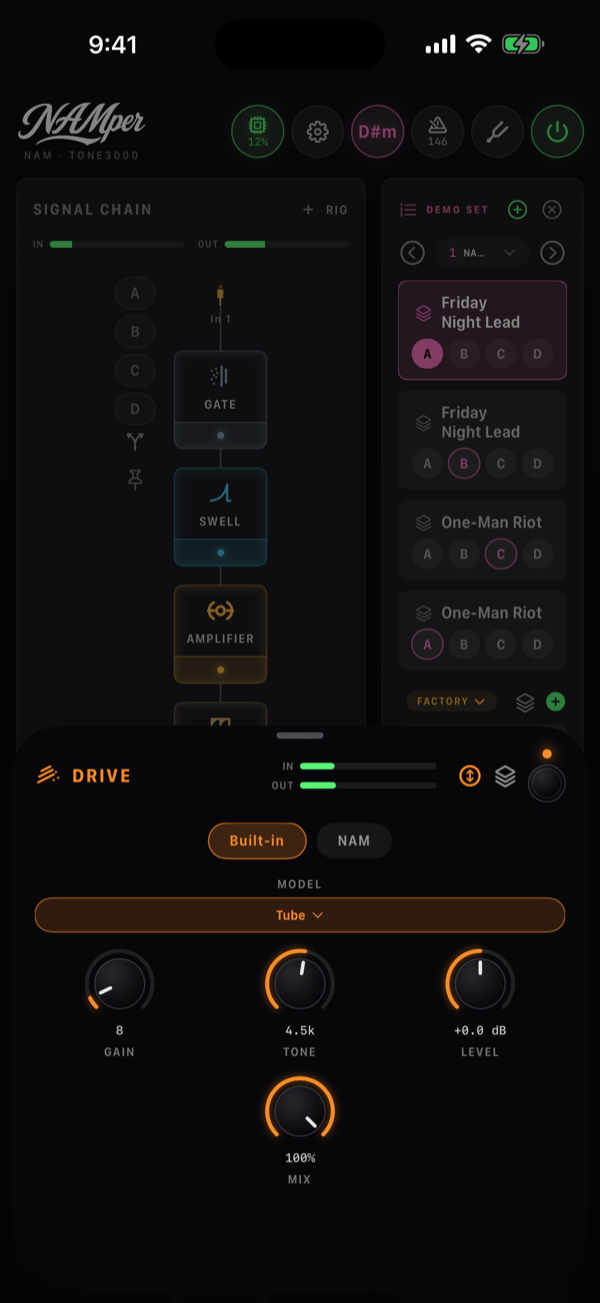
| Drive | Built-in · NAM · Model | Boost: Clean boost, Treble boost · Overdrive: Tube, Blues, Transparent · Distortion: Dist, Metal · Fuzz: Fuzz Ge, Fuzz Si, Octave fuzz |
| Amplifier | Built-in · NAM · Modeler · Model | Clean, Tweed, Brit, Chime, Modern, Bass, Acoustic · on Modeler, the fifteen amps of the HyperReal catalogue |
| Saturator | Type | Tube, Tape, NAM |
| Lo-fi | Type | Ring mod, Crusher, Telephone, Megaphone |
| Wah | Mode | Auto, LFO, Pedal |
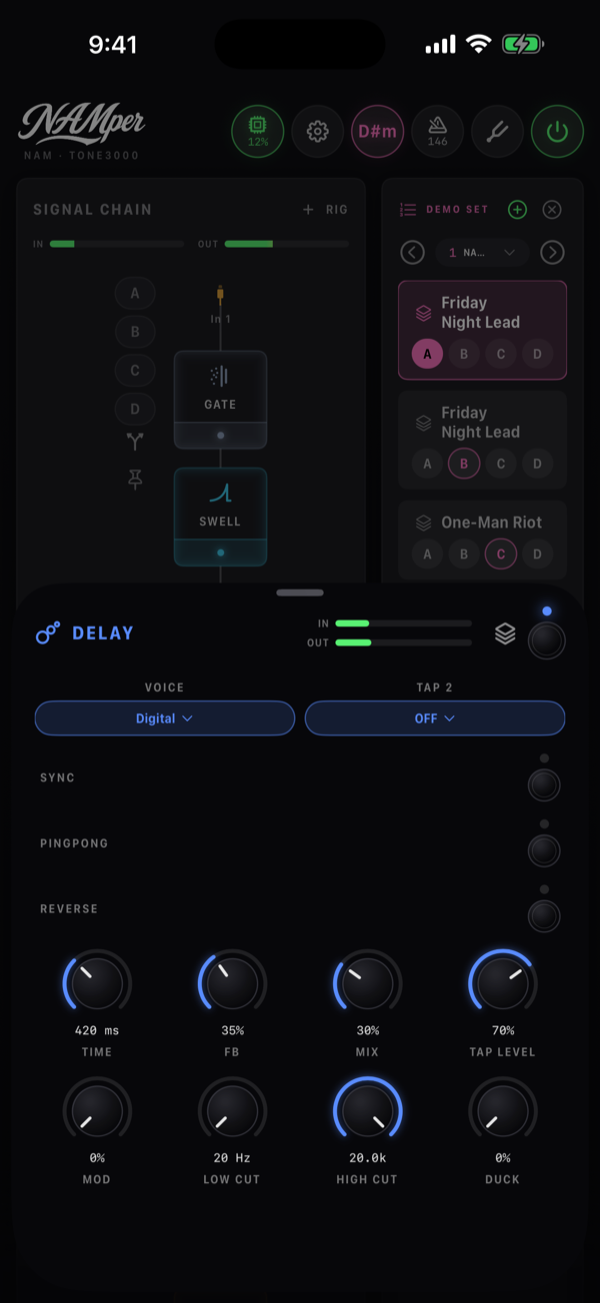
| Delay | Voice · Tap 2 | Digital, BBD, Tape · OFF, 1/2, 3/4, 2/3, 3/2, 2x of the time |
| Tremolo | Mode | Tremolo, Vibrato, Harmonic |
| Phaser | Mode | Phaser, Vibe, Vibrato |
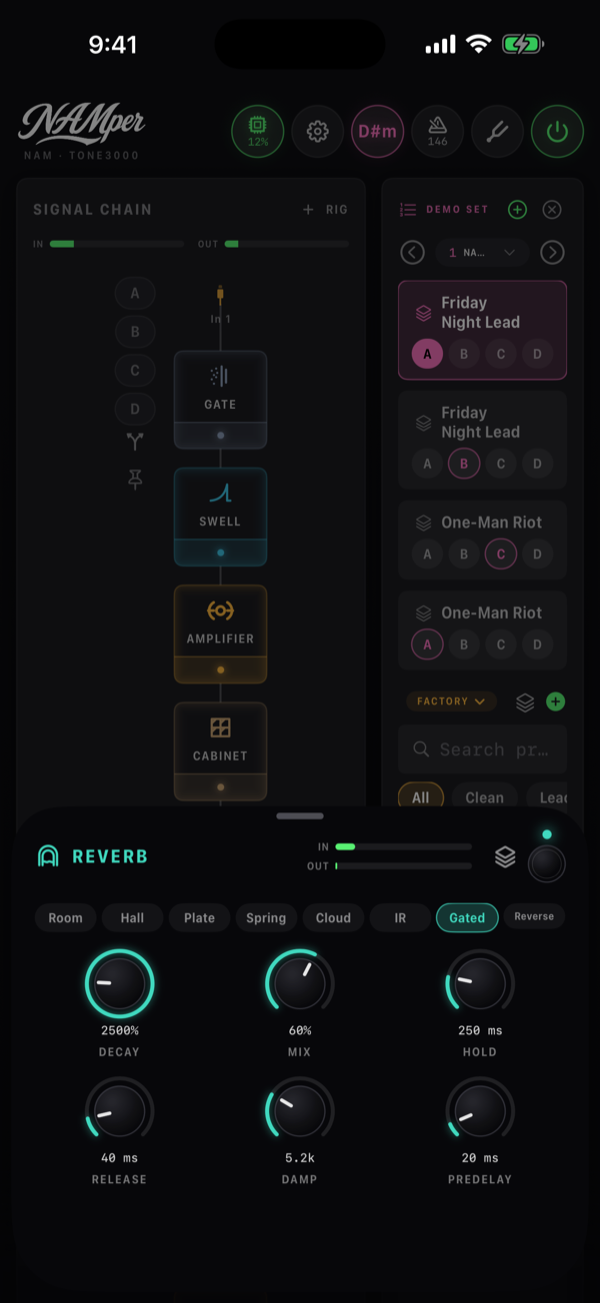
| Reverb | Type | Room, Hall, Plate, Spring, Cloud, IR, Gated, Reverse |
| Ensemble | Mode · Route | Velvet, Allpass · Stereo, Dual mono |
| Slicer | Pattern | On-off, Off-beat, Gallop, Dotted, Stutter, Pairs, Syncopated, Random |
| Pitch | Engine · Control | Mono, Poly, Voice · Fixed, Pedal |
| Harmony | Key from · Range · Voice 1…Voice 4 | Set key, Backing track, This input or another rig by name · LOW, MID, HIGH · OFF or an interval off the sung note, two octaves either way |
| Autotune | Key from · Range | Chromatic, Backing track, Set key · LOW, MID, HIGH |
| Synth | Wave · Note | Saw, Square, Pulse, Sine · Loudest, Lowest |
| Vocoder | Voice · Carrier | This input or another rig · Saw, Pulse, Chord, Noise |
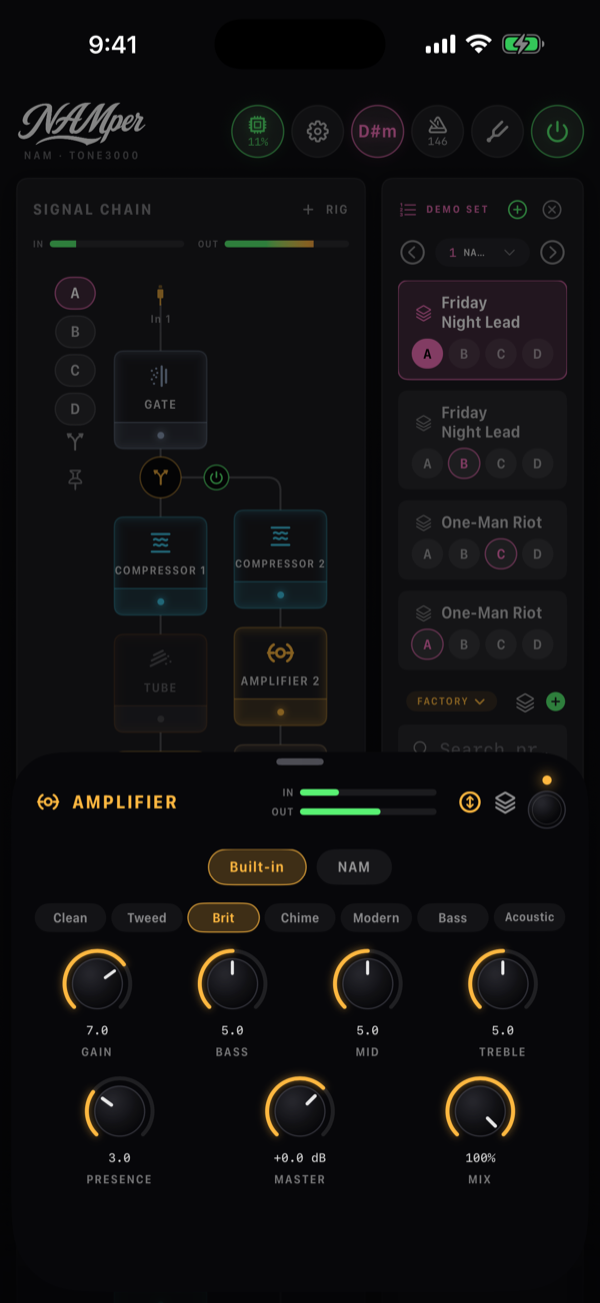
The Amplifier block's Built-in side is NAMper's own tube amp, with the knobs you expect: Gain, Bass, Mid, Treble, Presence and Master, and seven voicings on the Model chips. It needs no download and no account, which is why it carries the show when you are offline; the NAM chip beside it swaps in a capture, and the Modeler chip an amp computed from its circuit — see NAM captures and HyperReal amps below.
Saturator is where the old Tube Sat and Tape Sat went: one block, Tube, Tape or a NAM capture of an outboard box on its type chips. Ensemble is one instrument heard as several players across the panorama — no LFO, nothing detuned, and the mono sum is the input; Velvet or Allpass on its mode chips.
Drive, dynamics and time
The Drive block's built-in side holds ten circuits in four families, picked from a list, and each family wears its own knobs: a boost Gain, Bass, Treble, Level and Mix (the clean guitar blended back in); an overdrive Gain, Tone, Level, Mix; a distortion Gain, Tone, Bass, Treble, Level; a fuzz Gain, Tone, Bias (the operating point), Voltage (the battery — past the middle it sags and gates) and Level. The ADD menu lists one Drive, and the chain names the block by its circuit, so a stack reads TREBLE BOOST, TUBE, FUZZ GE.
Every Compressor face now also carries Knee, Mix (less than all of it is parallel compression) and HPF, a high-pass on the detector only, so the lows do not pump the rest.
The Delay gained a second tap at a ratio of the time — Tap 2 with its Tap level, for dual and rhythmic delays — plus Reverse, Mod on the repeats, Low cut and High cut inside the feedback loop (each repeat darker or thinner than the last) and Duck, which holds the repeats down while you play and lets them up in the gaps.
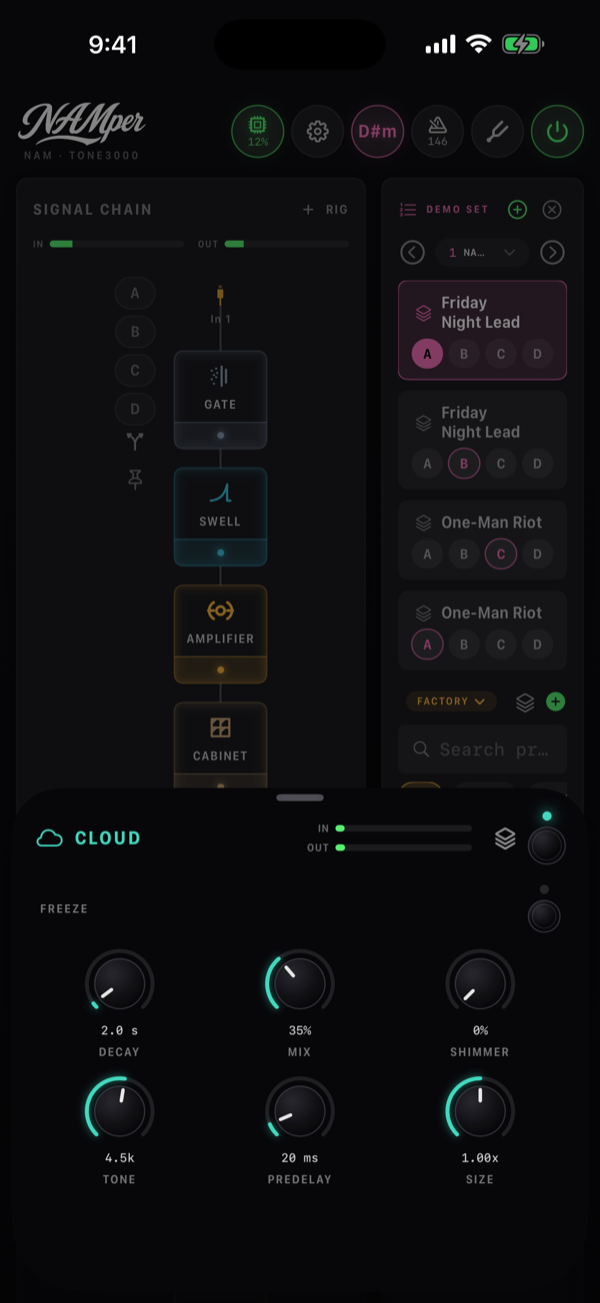
The Reverb has two new types. Gated is the eighties drum room: a dense plate cut off by a gate that opens on a hit, holds for Hold and closes over Release. Reverse plays the last Time seconds backwards, continuously, so a decaying note comes back as a swell; Regen feeds it back. On Cloud the shimmer's Interval is now a choice: +8ve, +5th, an octave and a fifth, or -8ve.
The Phaser's Mode adds Vibe — four staggered stages swept by the lamp's waveform, the throb rather than the notches — and Vibrato, the Vibe heard wet only. The Tremolo adds Harmonic: the signal split at 800 Hz and the halves swung against each other, a tremolo that reads as a slow phaser.
Pitch and voice
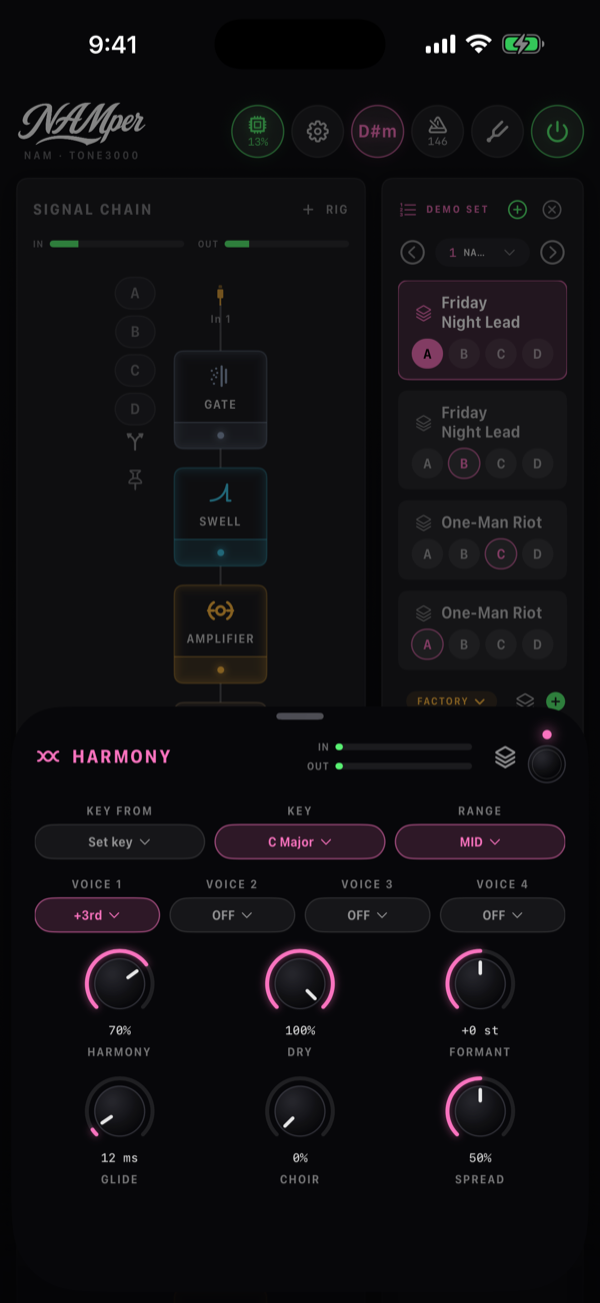
Harmony sings up to four voices, for a singer or a guitar. Key from says where the key comes from: Set key uses the key list, Backing track follows the song's detected key, This input learns it from what is sung into this chain, and the other rigs are listed by name. Voice 1…Voice 4 are each an interval off the sung note, or OFF, so a third, a fifth and an octave make a chord. The voices keep the singer's formants — a fifth up still sounds like the same person — and Formant moves them on purpose. Choir turns every voice into a section of four singers, each drifting on its own, and Spread pans them across the stereo field.
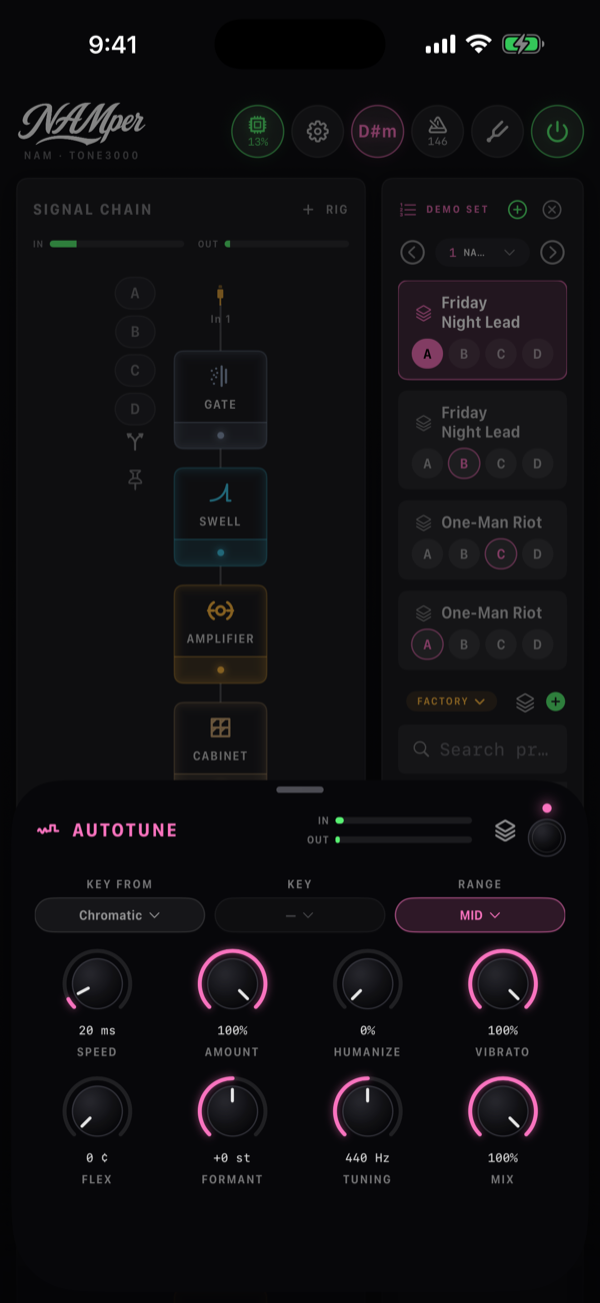
Autotune takes its key from Chromatic, Backing track or Set key, keeps the singer's formants and lets consonants through. Besides Speed and Amount it now has the singer's own controls: Humanize (a held note retunes slower), Vibrato (how much of the singer's vibrato survives), Flex (a note further off than this is left alone — a scoop on purpose), Formant and Tuning, the reference A.
The Pitch block has three engines: Mono for single-note lines and bends, Poly for chords, and Voice for a singer — the vowels keep their shape an octave up or down, and Formant (on that engine only) makes a bigger or a smaller singer at the same pitch. Control on Pedal turns it into a whammy: the interval slides from Heel to Toe as an expression pedal moves Pedal.
Mix, tempo sync and tails
Almost every block has a Mix. The ones built around a blend carry it on their own face — a delay's Mix, a harmoniser's Dry, a freeze's Level; every other block but the Amplifier, a hosted plugin included, gets a Mix knob as its last knob: the block blended with its own input, so a tremolo can half-chop and a drive can carry a little direct signal. The dry is delayed to match the block, so nothing comb-filters, and scenes, presets and MIDI treat it like any other knob.
Tempo sync is a switch. The delay, the tremolo, the slicer, the phaser, the flanger, the chorus and the rotary each have a Sync switch. On, the rate or time knob turns into note divisions (1/1 to 1/16, dotted and triplet on the delay) that follow the set tempo; off, it is plain Hz or ms again.
Tails ring out. A delay, a reverb, an FX loop or a hosted plugin that a scene or a footswitch bypasses keeps ringing over the dry until it is quiet, and a preset switch lets the old rig's tails play on for up to eight seconds instead of cutting them. The switch for this is Tails on a switch in Settings → Audio, on by default. A held sound is not a tail: a Freeze bypassed, or the Cloud's freeze switched off, fades out in 10 ms and is gone.
Harmony's Key from is not a routing control — it is where the harmoniser takes its key from. On This input it learns the key from the signal in its own chain; point it at another rig by name and a vocal line can be harmonised against what the guitar rig is playing.
02.3The seven EQ models
There is one Equalizer block, and inside it seven completely different equalisers. Switching the model swaps the knob set as well as the sound, so pick the one that matches the job — a quick tone tweak, a surgical cut, or a mastering-style shelf.
| Model | What it is | Knobs |
|---|---|---|
| Tone | Classic three-band — low shelf at 100 Hz, peak at 800 Hz, high shelf at 3 kHz. These are the same filters as the old three-band EQ, so older rigs sound unchanged. | Bass, Mid, Treble, each ±12 dB |
| Para | Full parametric — the same three bands, but every frequency moves and the mid gets a Q control. | Low, Mid, High, Lo Freq 40–400, Mid Freq 200–5000, Hi Freq 1k–12k, Q 0.3–4 |
| Passive | The classic passive program-EQ trick: a low shelf boost plus a slightly higher cut shelf, so you boost and attenuate at once for a tight low end — with a wide high bell and a high shelf cut on top. | Lo Boost, Lo Atten, Lo Freq 20–120, Hi Boost, Hi Freq 2k–16k, Width, Hi Atten, Atten Hz 4k–20k |
| Console | A British console channel strip — a 12 dB/octave high-pass (0 turns it off), an LF shelf, a low-mid bell with Q, and an HF shelf. | HPF 0–300, Low, Lo Freq, Mid, Mid Freq, Q, High, Hi Freq |
| Bax | Baxandall — two very wide, very gentle shelves. The one to reach for when you want the whole sound a little darker or a little brighter. | Bass, Treble |
| Graphic 7 | The stomp-box graphic: seven octave bands from 100 Hz to 6.4 kHz, a fader each. Double-tap a fader to flatten it. | 100 … 6.4k, each ±12 dB |
| Graphic 10 | The rack graphic: ten octave bands from 31 Hz to 16 kHz, a fader each. | 31 … 16k, each ±12 dB |
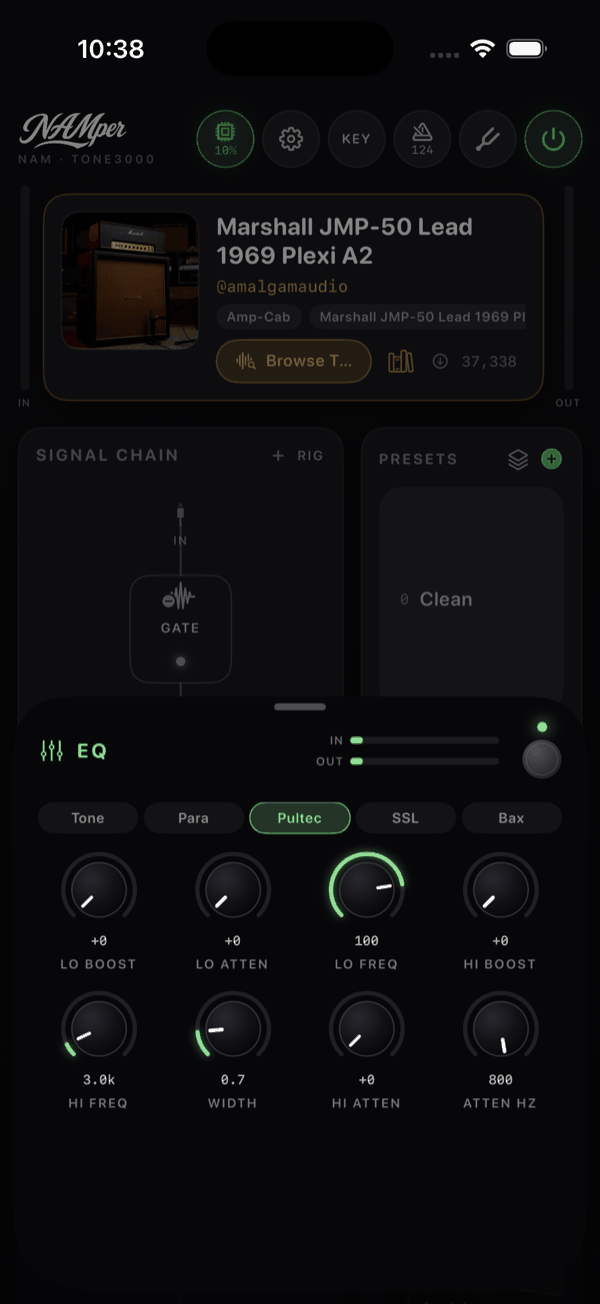
Every block sheet, this one included, has horizontal IN and OUT meters. On an EQ they are worth watching: a few decibels of boost on three bands adds up fast, and the meters tell you whether the next block is being hit harder than you meant.
02.4NAM captures
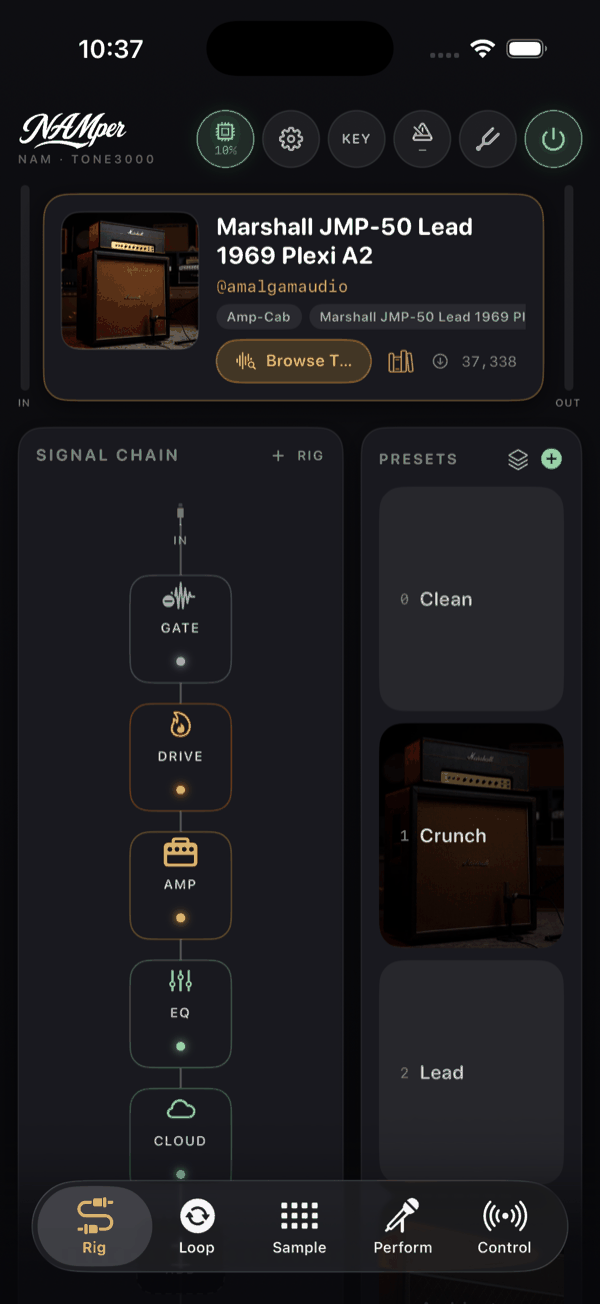
The Amplifier block is one block with three sources. Three chips at the top of its sheet choose between them: Built-in is NAMper's own amp simulation with the seven voicings listed above, NAM is the Neural Amp Modeler player running a .nam capture of a real amplifier, and Modeler is HyperReal, an amp computed from its circuit (below). All three live in the same block, so a preset carries the voicing it was built on, the capture it was voiced around and its HyperReal amp, and switching between them is one tap — the sound that plays fades out as the next fades in, with no click and no gap.
The capture side
On the NAM side the sheet shows the model's name (or No model loaded), the @author and an arrow that opens the tone on tone3000.com, the cover art on the left, and three ways to get a capture on the right: Browse TONE3000, Library and Load file. Underneath are Input and Output, both −20 to +20 dB and starting at 0. Input pushes the capture harder, which is how you get more or less breakup out of a profile; Output trims the result afterwards.
Levels are measured, not guessed: both sources are unity on the same reference DI, so a preset's output gain means the same thing whichever one is playing, and swapping profiles does not throw your levels around.
Load file takes several .nam files at once. Pick more than one and the app asks Combine the models into a bank? — Combine makes a bank of them, Only the first loads one.
A NAM capture is a mono device — a stereo signal arriving at the Amplifier block is summed before it goes in. Put your stereo effects after the amp, not before it.
Banks and the Model knob
A TONE3000 tone often ships many models: the same amp through different microphones, channels or cabinets. Download them together and they become the block's bank. The sheet then reads Bank: 6 (or Bank: 4 of 6 when some are left out of the sweep) and a Model knob appears between the trims, reading 1/6 · SM57 as it turns. It is an ordinary knob, so a long press offers MIDI Learn: one CC then walks the whole bank from your pedalboard, and the change is crossfaded rather than cut, so nothing clicks or drops out.
Choosing what goes in the bank
A tone with more than one model opens Choose a model, and in that sheet the ticks are the bank. They start on the models the block already carries, so the sheet opens on what you have rather than on nothing, and the line at the top reads Bank: 3 models — the Model knob steps through them. Tick and untick to shape the sweep: Select all 6 ticks the lot and turns into Deselect all — neither of them downloads anything. The button underneath is the one that acts, and only on what is ticked: Download 5 selected into the bank. While the ticks still match the bank it stays quiet, because there is nothing to fetch.
That is how a bank is trimmed as well as built: open the picker again, untick the models you never reach for, download, and the sweep is rewritten around what is left — files you already have are not fetched twice. A tap on a model's name is the other path, and the sheet says what it costs under the list: One model plays alone: choosing it clears the bank of 3. Models the site lists but you do not have yet are dimmed with a cloud icon until you tick them.
Pedals and outboard: captures in other blocks
There is no separate capture block any more: the blocks that model a kind of gear carry a capture side of their own. The Drive takes captures of pedals, the Saturator and the Compressor take outboard boxes — each with the same NAM chip, trims and bank Model knob as the amp. You do not have to place them yourself: load a pedal capture while an Amplifier is aimed at, and NAMper puts it in the rig's Drive — inserting one right before the amp if there is none — and opens it for you; an outboard box lands in a Saturator the same way. Real outboard gear, rather than a capture of it, goes into the chain through the FX Loop block. Older presets that used a NAM block open with it converted.
The library
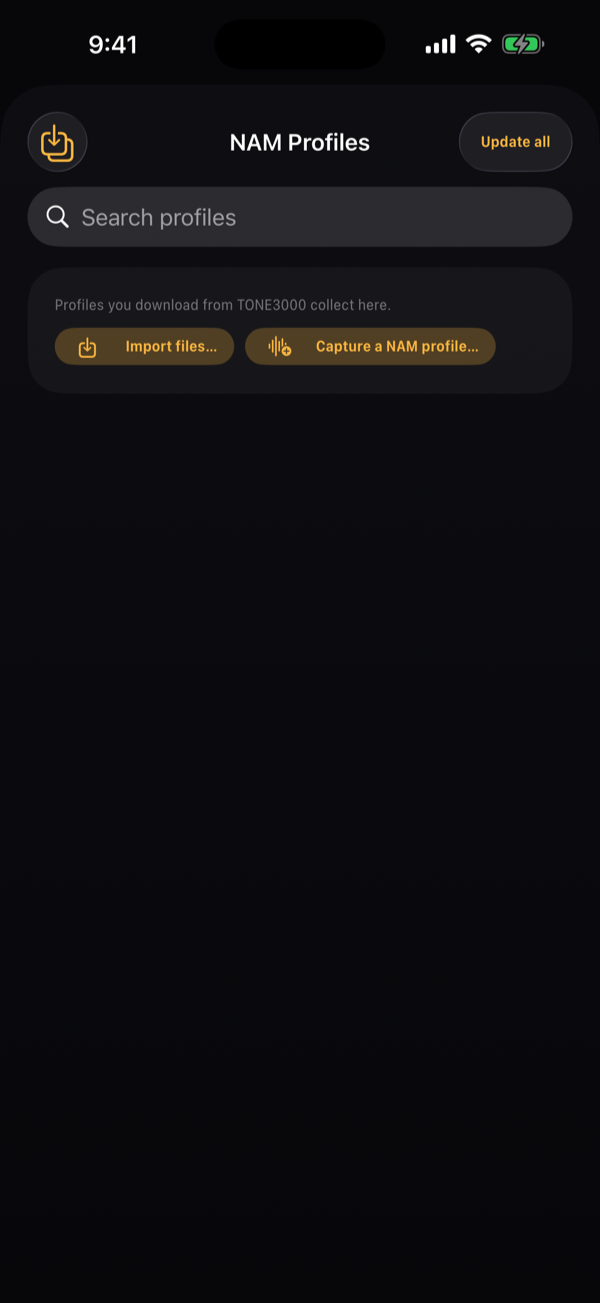
The Library button opens a sheet named after its side — NAM Profiles for the amp's captures, Cabinets or Spaces for the impulses — with everything you have downloaded, available offline. It has five sides, one per kind of block: Amp and Drive for captures, Outboard for the saturator and the compressor, Cab for cabinet impulses and Reverb for the reverb's — spaces, outboard boxes and experiments. A block only takes one of the five, so they are never listed together: the block you opened the library from picks the side and keeps it, and with no block to aim at, chips across the top name the five with a count each. The impulses shipped with the app sit on their sides under Built-in, next to the ones you download.
Inside a side, tones are grouped by what was captured: Built-in first, then Amplifiers, Pedals, Outboard, Experimental, Cabinets, Spaces and Other. Each row is a tone, not a file: cover art, title, @author and how many models it ships. A tap loads it — a tone with one model plays alone, a tone with several becomes the block's bank — and the tone lands where it belongs: an amp in the Amplifier block, a pedal in the Drive before it, an outboard box in the Saturator, a cabinet in the Cabinet after it, a space in the Reverb.
The chevron opens the tone's models. In the tone that is the block's bank each model carries a checkmark: it keeps that model in the Model knob's sweep, and a tap moves the knob onto it. In any other tone a tap on a model plays that model alone and clears the bank. Models the site lists but you do not have yet are dimmed with a cloud icon; a tap fetches one, and in the bank tone it joins the sweep.
On the right of every tone row: the star (a favourite — starring a tone stars all of its models) and the refresh button (Refresh from TONE3000, which re-fetches the metadata, the cover and the files). A long press, or a right-click on a row, offers Open on TONE3000, Share .nam file / Share IR file and Delete. The toolbar has Import files… — a multi-select picker that takes .nam captures and .wav impulses — along with Export all (N files) and Update all.
Empty, the NAM side reads Profiles you download from TONE3000 collect here.; the impulse sides always hold at least the built-ins. If a model cannot be read you get Could not load amp model {filename}. — usually a file that was moved or deleted out from under the rig.
Capture your own gear
Capture a NAM profile… in the library's toolbar — on the captures' sides, not on the cabinets' or the spaces' — makes a capture of your own amp, pedal or whole rig on the device, with nothing but an audio interface. It is the reamp loop every NAM capture is made from: the signal leaves the interface on one output, goes through the gear and comes back on one input. The Capture window picks that output and that input by the interface's own channel names; while it is open the live rig is cut, so a looped-back rig cannot feed itself and howl. Set the send level, and Check levels plays the head of the signal with two meters and a note on how much to move the send — the return should peak near −6 dBFS and never clip. If the input already carries sound the send did not cause — the gear feeding back through the loop, or a host playing its track through the plug-in — the note says so: turn the gear's input or the send down, or stop playback, and check again.
Start capture (190 s) plays the NAM trainer's own standardized signal, v3_0_0.wav, so a take made here trains here and in any other NAM trainer as well. The take is looked at before anything is trained: the blips near the start locate the round trip, two copies of the same stretch at both ends measure the drift between two clocks, and a take where nothing came back, the return clipped or the loop changed nothing is refused. Train runs on the device — Nano, Feather (the default), Lite or Standard, for as many epochs as you set — and shows the epoch and the ESR on audio the trainer never saw (0.02 is a good capture). The result lands in the library as your own tone, tagged with its gear, and Share .nam file hands it to any NAM player.
Would rather train elsewhere? Share the recording (on the Mac, Save the recording…) hands over one file, the return as a 48 kHz, 24-bit WAV — all TONE3000's trainer and the NAM trainer need, since they already have the standardized signal.
02.5TONE3000
TONE3000 is a free library of captures, and NAMper pulls from it directly. There is no in-app browse screen: Browse TONE3000 opens tone3000.com inside a secure web sheet. You search and filter on the website itself, pick a tone, and the app takes it from there — while it fetches, the button reads Loading… and is disabled.
Signing in is an ordinary web sign-in, not a pasted API key, and if you are already logged in to tone3000.com in the browser the app reuses that session. NAMper never asks for it at launch — the factory presets play on HyperReal amps (or the built-in ones) and the bundled cabinets, and the sign-in happens the first time you press Browse TONE3000 in a block that takes a capture. Settings has no TONE3000 page.
What the catalogue offers depends on the block that opened it. From an Amplifier it is filtered server-side to A2-architecture .nam captures of amps and full rigs, from a Drive to pedals, and from a Saturator or a Compressor to outboard gear. From a Cabinet block it offers the site's cabinet impulses, and from an Reverb its spaces — .wav files, not captures. That filter is fixed, not a setting you can change.
When the tone you picked has one model, it lands straight in the block with its cover art and metadata. When it has several, a picker opens: tap one to play it alone, or tick a few and Download {n} selected into the bank — the whole tone is Download all {n} models into the bank. Everything lands in the app's tones/ folder and joins the library.
The factory presets: HyperReal, captures or built-in
The Settings index carries one choice, under FACTORY PRESETS, of the amps the factory bank plays: Built-in amps, TONE3000 captures or HyperReal (the chip wearing the HyperReal mark). HyperReal is the default — see HyperReal in the factory bank. The factory rigs were voiced around four public captures — an American clean combo, a British crunch head, a modern high-gain head and a British chime combo — and TONE3000 captures puts the bank on them: it asks you to sign in and downloads the four once. Whichever you pick, each Amplifier block still switches to another source with one tap. NAMper also offers the captures once, the first time you pick a capture of your own.
Playing offline
Anything already downloaded keeps working with no network at all. An Amplifier block whose capture is not cached plays its own built-in voicing meanwhile and says so (Not downloaded yet — the built-in amp plays meanwhile), with the Cabinet after it awake for the built-in amp. Sign in later and those blocks resolve to the real captures in place — you do not have to rebuild anything.
NAMper has no TONE3000 sign-out button. Once the session exists, the only way to clear it is to delete the app. Worth knowing before you sign in on a borrowed device.
When something goes wrong the app says which of the four things it is: TONE3000: sign in to load %@., TONE3000: the server had a problem (HTTP %lld) — try again later., TONE3000: unexpected reply for %@. and TONE3000: no connection — check the network.
The tones/ folder is excluded from iCloud backup on purpose — a restore-from-backup will not bring your downloaded profiles with it, because TONE3000 can fetch them again. If a particular capture matters to you, export it from the NAM Profiles sheet and keep the file.
02.6HyperReal amps
HyperReal is NAMper computing an amplifier from its schematic, part by part: every tube stage with its own tube, the tone stack, the phase inverter, the power tubes, the output transformer, the speaker they drive and the power supply that sags under them, with the values of the parts the amp was built with. Its knobs turn the circuit's own pots and its switches change the circuit itself, so it answers your picking and its controls the way the circuit does. Nothing is downloaded and no account is needed: the catalogue ships inside the app, on the phone, the tablet, the Mac and in the plug-ins.
In the Amplifier block it is the third chip, Modeler. Tap it and the block plays a HyperReal amp; the chip then wears the amp's name with an arrow, and a tap on it lists the catalogue. Under the chips sit the HyperReal mark and the amp's own controls, named as on the amp — Volume, Treble, Middle, Bass, Presence and whatever else that circuit has, up to sixteen. A switch shows its positions as chips — Cali Mark IV's Pull fat and Pull bright as On and Off — and a few on/off switches (Bright, Presence shift, Ultra hi) as a toggle. Change the amp and the knobs it shares with the last one keep their positions; the new amp blends in while the old one plays on, so the change does not drop out.
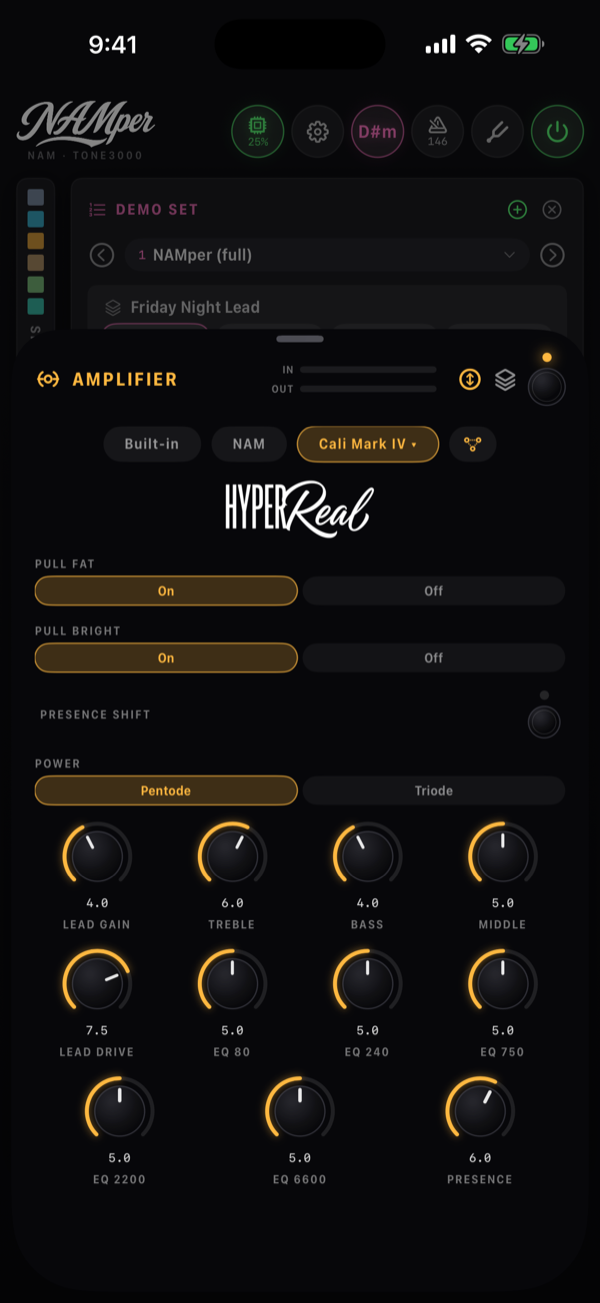
Every amp has a plain output volume after it, its last knob (Master or Output). While the block's Auto level is on, that knob is Auto level's and is not shown: the amp is levelled at every position of its gain, its master and its switches, the way the built-in amp and the captures are, so turning the gain shapes the sound and not the volume. Switch Auto level off and the knob appears and the amp is as loud as its circuit makes it.
The knobs are ordinary knobs: a long press offers MIDI Learn, scenes and the morph pedal move them, and in a plug-in host the Amplifier's Modeler 1…Modeler 16 parameters reach them in the amp's order.
A circuit costs far more processor than a capture or the built-in amp. On iPhone, iPad and Android it gets a processor core of its own — Amp modeler on its own thread in Settings → Audio. If the DSP load chip runs red, a larger buffer or one amp fewer is the first remedy.
The catalogue
Fifteen amps — tube amps from the late fifties to the nineties, two solid-state ones and two for bass. The names are NAMper's own.
| Amp | What it is | Switches |
|---|---|---|
| Tweed Deluxe 57 | A small late-fifties tweed combo: two 6V6, a 5Y3 tube rectifier, 15 W | — |
| Tweed 59 | The big late-fifties tweed: two 5881, a GZ34 rectifier, 45 W | Channel: bright, normal or both jumped |
| Black Twin 65 | A mid-sixties American clean combo: four 6L6GC, 85 W | Bright |
| Black Deluxe 65 | A mid-sixties American combo, the small one, with no middle knob: two 6V6, a GZ34 tube rectifier, 22 W into one 12-inch speaker | — |
| Brit 45 62 | An early-sixties British head: two 6L6, a GZ34 rectifier, 30 W | Channel: bright, normal or jumped |
| Brit Top 63 | A sixties British chime combo with the treble-boost tone stack: four EL84, a GZ34 rectifier | — |
| Brit Super 68 | A late-sixties British 100 W head: four EL34 | Input: high treble, normal or jumped |
| Brit 800 | An early-eighties British master-volume head: four EL34, 100 W | Input: high or low |
| Cali Overdrive | An eighties Californian overdrive special: a clean channel and an overdrive with its own drive, tone and level; two EL34 | Overdrive |
| Cali Mark IV | A nineties Californian lead channel with a five-band graphic EQ: four 6L6GC | Pull fat, Pull bright, Presence shift, Power: pentode or triode |
| Cali Rect | A nineties Californian high-gain head: four 6L6GC, 100 W | Rectifier: tube or diode |
| Block Letter 51 | A nineties high-gain head with a pre and a post gain: four 6L6GC, 120 W | — |
| Jazz Clean 77 | An eighties solid-state clean amp, an op-amp preamp with its own distortion | — |
| Bass Tower 70 | A 300 W tube bass head: six 6550 | Ultra hi, Midrange select: 220, 800 or 3000 Hz |
| Rack Bass 800 | An eighties solid-state bass preamp that ends at its DI — no speaker | — |
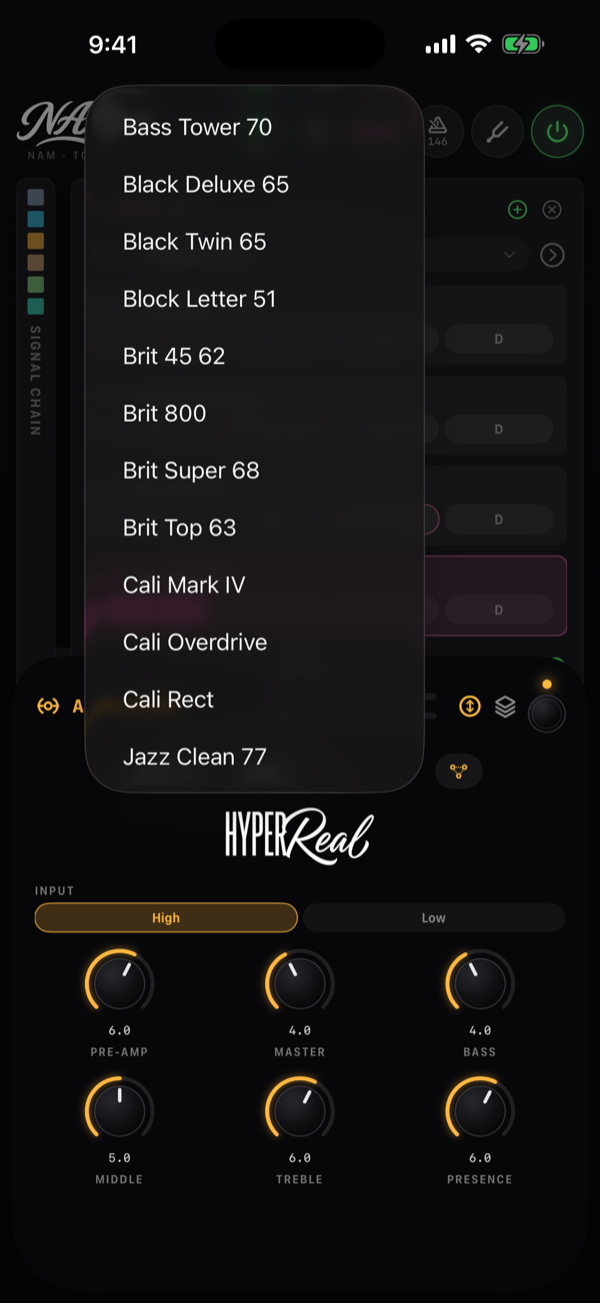
An amp's output is the voltage on its speaker with no cabinet: put a Cabinet after it, as you would after a real head. A newly chosen amp starts on Brit 800.
The circuit
Beside the amp's name a small button with a circuit icon (Circuit to a screen reader) opens the amp's circuit, headed by the HyperReal mark and the amp's name; Done closes it. Under the heading are the switches as they stand and two views, Blocks and Schematic. Both are drawn for the switches as they are set, so flipping a switch in the block redraws the circuit.
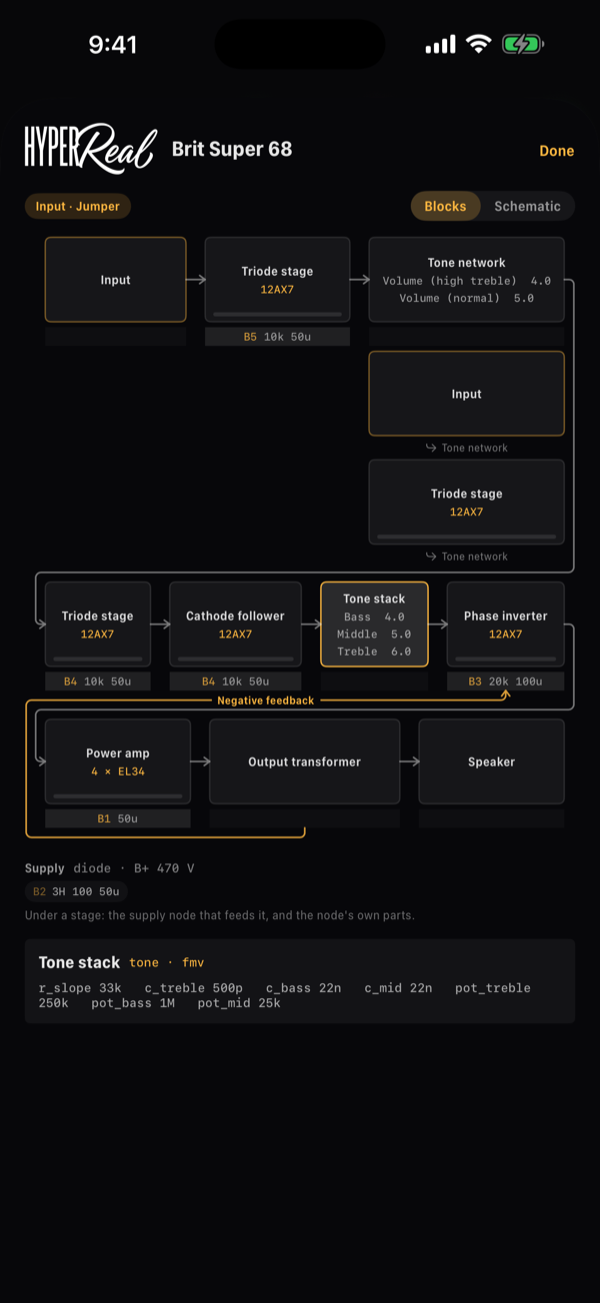
- Blocks lays the stages out in the order the signal passes them, wrapped onto rows across the screen: the input, each tube stage, the tone stack, the phase inverter, the power tubes, the transformer, the speaker. Each knob sits on the stage it turns, the negative feedback is a line from where it leaves the path to where it comes back, and under every stage is the supply node that feeds it, with its parts — Supply at the foot explains the node letters.
- Schematic draws the same circuit as parts with their values — tubes, resistors, capacitors, the pots under their knob names, the transformer and the speaker, and the supply chain under it all; a tube rectifier is drawn as a tube.
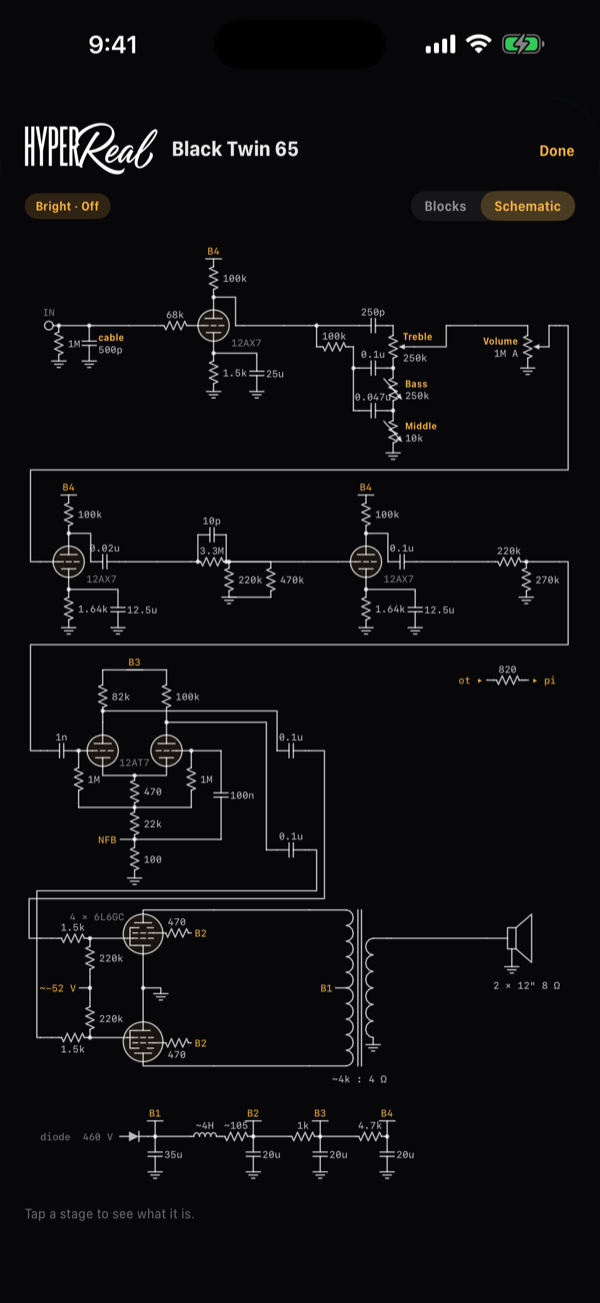
The drawing is live while you play. A tube stage shows its level — a bar along its floor on Blocks, a glow on the tube on Schematic — and turns red while the stage clips; a supply node shows how many volts it sags as the tubes draw on it. Tap a stage to see what it is. — a tap opens a card with that stage's parts.
HyperReal in the factory bank
Unless you have picked otherwise under FACTORY PRESETS in Settings, the factory presets play HyperReal: every guitar and bass rig carries the HyperReal amp that matches the voicing it was written on — clean, tweed, British, chime, modern, bass — or one of its own, with the cabinet after it; the bass rigs, which have no cabinet, take Rack Bass 800, a preamp that ends at its DI. The acoustic rigs keep the built-in amp. A factory rig may set its amp's channel too: Lone Star Lead plays Cali Overdrive with its overdrive on.
If the processor cannot carry a circuit — the DSP load stays at its limit for a few seconds while a factory preset plays HyperReal — the bank steps back to the built-in amps by itself and keeps that choice, so the next preset does not stumble the same way; Settings shows it, and you can pick HyperReal again once there is room (a larger buffer, fewer rigs). The plug-ins offer the same three choices without the step back.
02.7Cabs and IRs
The Cabinet block plays an impulse response — a speaker cabinet captured with a microphone. Its sheet is built like a capture block's: the impulse's name across the top with the @author, an arrow to the tone's page and Clear IR beside it, the cover art on the left, and three ways to load one on the right — Browse TONE3000, Library and Load file. Under them sits the block's own knob, Level, −12 to +12 dB.
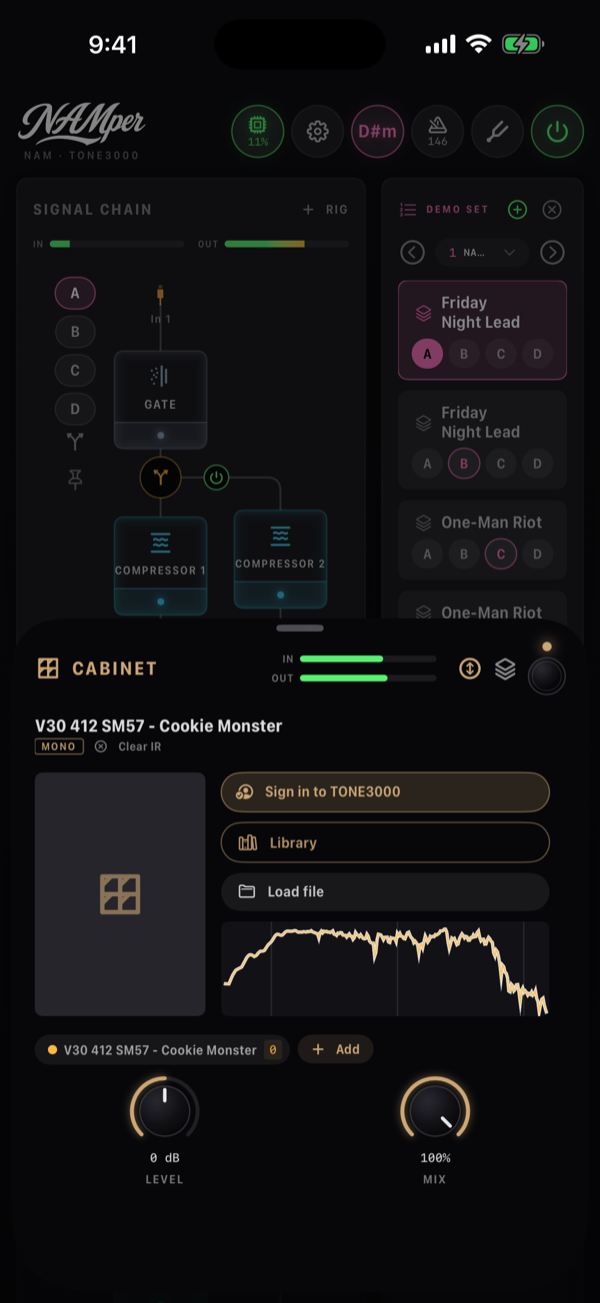
A Reverb on its IR type loads a space rather than a cabinet, from the library's Spaces side: the bundled ones, what you download, your own files. Loading a space into any Reverb turns it to the IR type.
Browse TONE3000 opens the site's cabinets from a Cabinet and its spaces from an Reverb. A tone with several impulses opens the same picker the captures use: play one, or tick a few and download them together. What happens next is where the two blocks part company. In an Reverb the ticked impulses become a bank like an amp's — Bank: 6 and a Model knob beside Mix, one space at a time, MIDI Learn and all. A Cabinet does not step through them: every impulse it takes becomes a slot, and the slots play together.
Several impulses in one cab
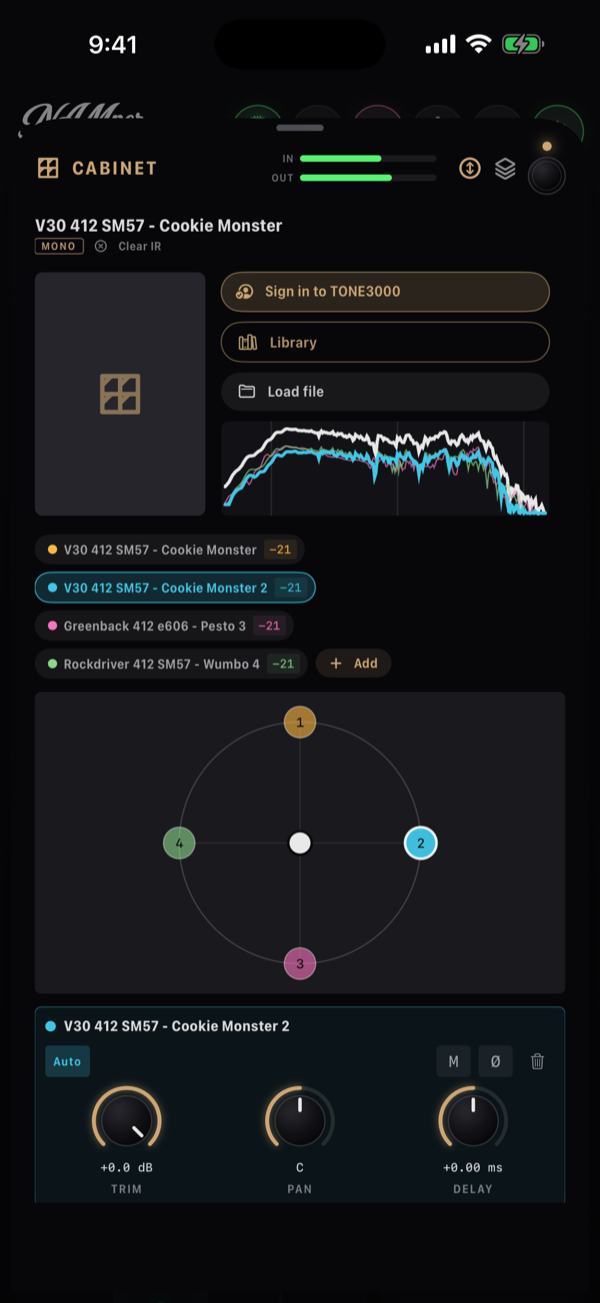
Two microphones on one cabinet, a 4×12 and a 1×12 side by side, a whole cabinet pack — one Cabinet block holds them all. Add beside the chips offers the three usual doors — From the Library, Browse TONE3000 and Load file — and whatever comes through one joins as a slot with a colour of its own. A tone with several impulses fills the block in one go: ticked in the picker, they arrive as slots. The response curves above the chips gain a trace per slot and a white one over them — the composite, which is what you hear.
Every chip carries that colour, the impulse's name and a badge with the level the slot plays at. A tap on the chip opens its card; a tap on the badge takes the slot out of the mix or brings it back; a long press solos it — the soloed slot is named on a line of its own under the chips, with a cross that lets the rest back in. A pack with more than a dozen impulses scrolls in a box of its own rather than pushing the sheet down.
The field underneath is the mix itself. The slots sit around a circle, the puck between them, and dragging the puck moves the balance the way moving a microphone would — no menus, no numbers. Blend X and Blend Y are ordinary parameters, so a long press on the puck offers MIDI Learn for each: two pedals, and the microphone position becomes something you play. The mix is re-rendered as you drag and handed to the convolver as a crossfade rather than a swap, so moving the puck mid-song does not click.
The card belongs to the selected slot: Trim, Pan and Delay under a row of buttons. NAMper measures how far apart the impulses sit and aligns them for you, and Auto holds that measurement until you turn Delay yourself — tap it again to hand the alignment back. The buttons beside it mute the slot, invert its polarity (worth a try whenever two microphones on one speaker sound thin) and remove it.
Load file opens a file picker for .wav and other audio; whatever you choose is copied into the app's irs/ folder, so it stays available even if you delete the original. A file loaded into a Cabinet lands on the library's Cab side, one loaded into an Reverb on its Reverb side.
| Library side | Bundled impulse responses |
|---|---|
| Cab | DV77 412 SM57 - Darth Genocider, Greenback 412 SM57 - Nacho, Greenback 412 e606 - Pesto, Rockdriver 412 SM57 - Wumbo, V30 412 SM57 - Cookie Monster, V30 412 SM57 - World Collider |
| Spaces | Chamber 0.9s, Hall 2.6s, Plate 1.6s |
Plenty of TONE3000 captures are taken from the speaker output, cab and microphone included; putting another cab after one of those makes the sound dull and boxy. NAMper reads that from the tone and handles it: a full-rig capture rests the Cabinet right after the amp, a bare head or a DI wakes it. A Cab left resting with no impulse in it is not even drawn in the chain — load an impulse into it, or switch the amp back to a bare head, and it comes straight back. The Cab's own footswitch always has the last word.
An empty Cabinet block says why it might stay empty: No IR loaded — amp+cab NAM profiles don't need one. An empty Reverb reads No IR loaded — pick a space or a file instead.
IR problems show as IR file missing: {name}, Could not read IR {name}. or Could not import {name}.
02.8Presets
A rig preset stores the whole chain — blocks, models, knob positions, scenes, the amp profile, the cab. Presets live on MIDI program-change slots in four banks of 128: Factory and User 1–3. Save one from the + on the PRESETS card, or from the preset manager: the Save preset sheet asks for everything a preset has.
| Field | What it sets |
|---|---|
| Name | Left empty, it saves as Preset. |
| Bank | Which user bank it goes into. |
| Program | The program-change number, starting on the first free one. A menu lists all 128; a taken number says which preset it would replace, a free one says free. |
| Categories | Chips to tick — the same categories the preset lists filter by. |
| Tags | Your own words, comma-separated; search finds them. |
Banks
The bank chip beside the PRESETS title, and in the preset manager, says which bank is up and switches it. The bank that is up is what the lists show and what program change n plays. From a pedalboard, MIDI Bank Select (CC 0) picks it — 0 is Factory, 1–3 the user banks — and Next preset bank / Previous preset bank can be learned onto any switch. A preset's menu has Move to bank for your own and Copy to bank for a factory one. A setlist is not tied to a bank: its presets play whichever bank is up.
Update with current rig on a factory preset asks first, then Save a copy puts your version into the user bank on its first free number, switches to that bank and plays it; renaming a factory preset makes the same copy. Update the same factory preset again and it edits that copy — and every song that recalled the factory preset recalls your copy from then on, scenes included.
Search and categories
The rail and the manager wear the same search field and category chips. Search matches names and tags, so "vocal" pulls up the whole vocal bank and "delay" every echo-flavoured rig. The chips narrow the list: All, Mine (only your own presets), then the categories — Clean, Lead, Blues, Ambient, Metal, Bass, Vocal, Utility and more.
The rail has two faces
The PRESETS card — the rail beside the chain on a tablet and on a phone held upright, however many rigs there are; the strip under the chain on a phone on its side — shows one of two things, and which one depends on whether a setlist is LIVE:
- No setlist live — the bank: every preset on its MIDI PC slot, with its cover, the search and the category chips, and a row menu holding Update with current rig, Rename…, Assign to set…, Move to bank, Share and Delete. Program change n applies preset n of the bank that is up.
- A setlist live — the set: the set's name, a song stepper (‹ name ›, and the name itself drops down the whole list to jump), and one pad per rig preset the current song brings up — not the 128 slots, but the four or eight sounds this number actually needs — with the bank under them. Program change n now presses stage button n: the songs while none is picked, then the picked song's own pads.
On stage the second face is the one that matters: the song is picked once, and what you reach for between choruses is this song's own sounds. Each pad carries the preset's name and its scene row — only the scenes that preset holds — with the entry's own scene outlined and the whole pad lit while it is the one playing. A tap on the pad brings that entry up exactly as its song lists it; a tap on a letter makes that scene the entry's own, and tapping the chosen letter again clears it.
The set is edited right there. Drag a preset from the bank below onto a pad (hold, then move — a plain swipe still scrolls) and it takes that pad's place, keeping its scene; drop it on an empty slot and it joins the song. A preset's menu has Add to this song, which lists the song's pads and a New pad. A pad's own long-press menu has Replace sound… (a picker across every bank), Current rig (the rig as it stands saved into the pad's preset), Clear pad and MIDI Learn. A long press on an empty slot offers Choose preset… and Current rig.
The stack icon in the set panel's header opens the full preset library anyway, and ⊗ leaves the setlist: the rail goes back to the bank, and so do the program numbers.
Between the chain card and the presets sit a grip and two chevrons. Drag the grip to give the chain or the presets more room, double-tap it to go back to the page's own split; a chevron folds the chain or the presets into a thin strip, and a tap on the strip brings it back.
Updating and managing
Overwriting is always confirmed. Update with current rig on one of your own presets raises Overwrite “{name}” with the current rig? with Overwrite and Cancel. Rename… also sets the program number: the preset already holding that number takes the old one in exchange. The manager itself has the nav title Presets, the bank chip, the search and the category chips, and two sections: Rigs · MIDI PC slots, and Everything at once → Global snapshots, described as rig, looper, sampler, setlist and control map saved and restored together.
Delete in the preset row menu takes effect immediately, with no "are you sure". Export a backup before a clear-out.
Import and export
The manager's import/export menu has Import preset / bank / backup…, Export rig presets (which writes NAMper Presets.namper) and Export EVERYTHING (full backup) (which writes NAMper Backup.namper). Note that a full backup carries parameters and references but not sampler kit audio.
The file extension is .namper. Tap one in Files, or receive one over AirDrop, and NAMper imports it and opens the preset manager. Every imported preset gets a fresh slot, so an import can never silently overwrite something you already had.
The factory bank
The Factory bank ships all 128 slots filled: the classic four on PC 0–3 — Clean, Crunch, Lead and Ambient, each voiced around a real capture — followed by themed rigs that walk through styles and eras, acoustic instruments, a bass bank, a vocal bank and utility chains. The newer blocks play their part in it: swells and freezes in the ambient rigs, a doubled vocal, a twelve-string, a synth bass and vocal strips. Every factory rig plays from the first second with nothing to download — on HyperReal amps unless you pick the built-in ones — and the bundled cabinets, and each is marked FACTORY in the manager. Hide factory presets in the manager's import/export menu takes the bank out of the bank menu; the same switch brings it back. Settings → RESET → Reset to factory presets clears your own presets; the dialog warns Delete ALL user presets? The four factory rigs come back.
Scenes and the morph pedal
Each rig has four scenes, A–D: bypass and knob positions for every block, with the chain and the loaded models left alone, so switching one is gapless. The scene that is lit follows your edits — a knob turned while A is up belongs to A from then on, so a tweak is never lost by switching away.
An expression pedal can also morph between two scenes. In Settings → Control, give a CC row the action Scenes → Morph with a pedal and pick the pair: every knob the two scenes disagree on follows the pedal between its two values, and a switch, a mode or a bypass flips at the halfway point — a clean-to-lead ride where the drive, the delay mix and the reverb all come up under one foot.
The other tabs have preset sheets of their own, reached from their PRESETS chip and all sharing the same design: Looper Presets, Sampler Kits, Perform Presets, Control Presets and Global Snapshots. Two of them cannot be shared, because they point at files on this device — sampler kits carry their audio, and global snapshots reference models, samples and backing tracks.
02.9Multiple rigs
NAMper runs up to four rigs at once — a guitar and a vocal, a guitar and a bass, or four players through one interface. Add one from the RIG + menu in the SIGNAL CHAIN header.
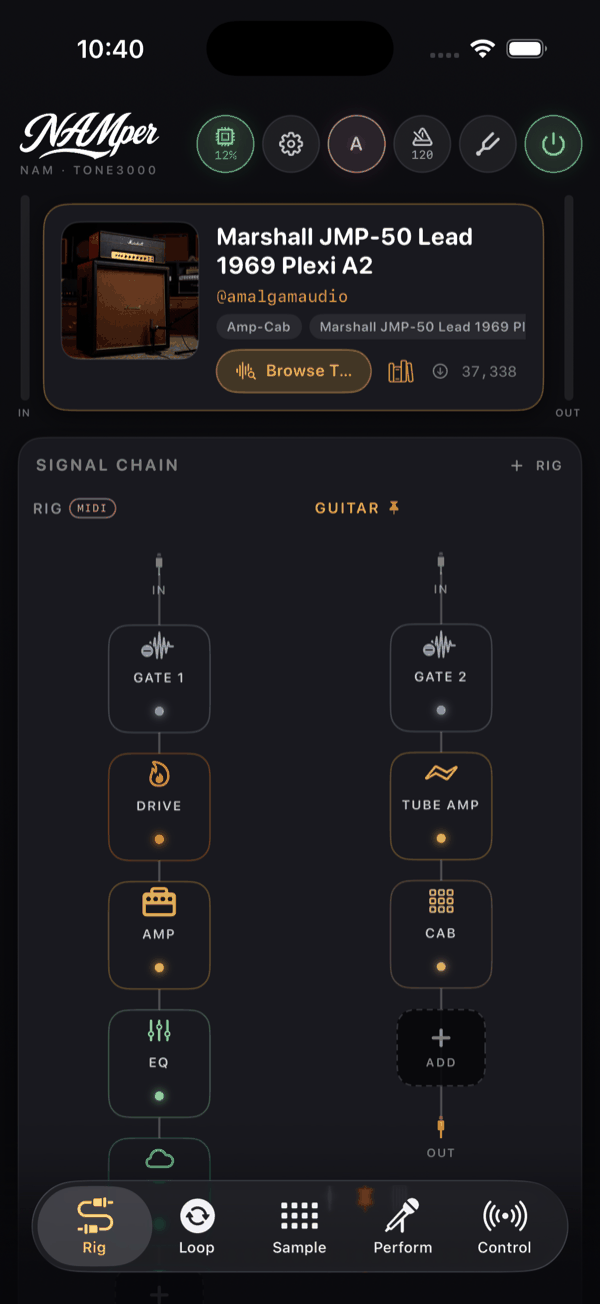
The menu's Templates section starts you somewhere sensible: Guitar rig, Bass rig, Vocal rig, Acoustic rig and Empty rig. Below that, From preset lists your saved presets by name — or opens a searchable NEW RIG FROM PRESET sheet once there are more than eight of them.
A template is not a bare chain. Each one lands with its four scenes filled and one branch beside the chain: the guitar's wet delay and reverb line (Clean · Crunch · Lead · Ambient), the bass's dirt taken before the amp and merged after it so the low end stays clean (Fingers · Pick · Synth · Dub), the vocal's detuned double (Dry · Verb · Double · Wide), and the acoustic's room, with a body cut and a presence lift instead of an amp (Strum · Fingers · Room · DI). The branch's power switch is part of the scene, so a scene change switches it in and out with everything else — and every template runs on the built-in tube amp and the bundled cabinets, so it plays offline the second it lands.
Rigs are named GUITAR, BASS, VOCAL, ACOUSTIC or RIG n depending on the template; a rig built from a preset takes the preset's name. Headers only appear once you have more than one rig.
Focus, pinning and removal
Tap a rig's header to give it MIDI focus — a badge marks which rig your controller is currently driving. The pin toggle (Pin rig / Unpin rig, captioned "presets keep this rig") makes a rig survive preset switches, which is how you keep a vocal chain intact while you change guitar sounds from a footswitch. A trash button (Remove rig) appears once there is more than one rig.
Layout follows the device: in landscape the rigs stack as rows with each chain running left to right; in portrait they sit side by side with the chains running top to bottom.
Each rig's input and output
The IN connector at the head of a chain is a menu. Its Sound-card input section lists your channels by name — In 1, In 2 and so on — and adds Sampler pads and Loop 1–Loop 4, so a rig can process a loop or the sampler rather than a live input.
The OUT connector opens a sheet headed RIG OUTPUT, with Level and Pan knobs, a Hardware output pair menu (Out 1-2, Out 3-4… — this needs Use all interface outputs switched on in Settings), and Record this rig into → Loop track 1–Loop track 4. The summary row underneath reads Looper: not assigned or, once you have picked some, Looper: track 1, 3.
02.10Parallel branches
A rig is not limited to one line. Each rig can hold up to four chains — the main one plus three branches — so you can split a signal, treat the halves differently and mix them back together. Create one with the branch-icon button under the chain (Add parallel chain).
Its menu has a single section, Branch from, listing each input channel, Sampler pads, Loop 1–Loop 4, and After {Block} for every block on the main chain. That last group is the interesting one: branching after the amp gives you two different reverbs on the same amp tone, branching before it gives you two different amps on the same guitar.
The two anchors
A branch draws as a parallel column with an entry anchor where it leaves the main chain and a merge anchor where it rejoins. The merge anchor shows that branch's level as a percentage, so you can read the balance without opening anything.
| Gesture | What it does |
|---|---|
| Tap an anchor | Opens the mixer sheet headed LANE {n} MIX, with Level and Pan |
| Long-press the entry anchor | The Branch input menu: own input, Sampler pads, Loop 1–Loop 4, Branch after {Block}, and Remove branch |
| Long-press the merge anchor | The Branch output menu: Into the main mix, Merge before {Block}, Own output 1-2, and Remove branch |
| Drag an anchor | Re-attaches it at a different point along the main chain |
Dragging is the fast way to audition: hold the merge anchor, slide it earlier or later in the chain, and hear the branch land before or after the delay without opening a menu.
Switching a branch out
A power switch sits on the branch's own wire, a little way past the fork. Tap it and the whole branch leaves the graph — it is drawn dashed and dim, and nothing in it is processed. The same switch is in the branch's menu and, as Bypass branch / Enable branch, in its mixer sheet and on its strip in the Mix tab.
Scenes remember it, so a parallel amp or a sub-octave can come and go with a footswitch instead of being rebuilt. That is how the factory rig Friday Night Lead works: its octave branch is switched out everywhere except the breakdown scene.
Put a Volume block at the point where branches merge and it grows an extra section, INCOMING LINES, with one knob per merging branch — Line 1, Line 2 and so on. That gives you a small mixer in the middle of the rig instead of chasing individual anchor sheets.
A branch can also skip the main mix entirely: point its output at Own output 1-2 and it goes straight to its own hardware pair, which needs Use all interface outputs enabled in Settings first.
02.11The master section
The MASTER strip is where everything meets: every rig, the looper and both send returns sum there before the hardware output. Whatever you do to the master, you do to all of it. It used to sit at the foot of the Rig tab; it lives on the Mix tab now, in the column beside the faders — this section is the short version, the desk around it is on that page.
The dashed + bar adds master processing — up to six blocks, from the same families a chain offers, without the amp and the Send. They behave like chain blocks: tap a chip to edit it, long-press for Enable / Bypass and Remove.
The master and the two send returns take hosted plugins too: the same Plugins section sits at the foot of their add menus, so a third-party limiter can sit across everything.
There is no always-on master processor here. Saturation is a block you add — Saturator, with Tube, Tape or a NAM capture on its type chips and Drive, Tone, Mix and Level — and limiting is the Limiter block, with Gain, Ceiling (−12 to 0 dB, default −1) and Release. If you have not added them, they are not in the signal path.
Reading the master meters
Stereo peak bars L and R carry ticks at −12 and −6 dB. Beside them sits a BS.1770 loudness reading: a large momentary LUFS number with a smaller line below reading LUFS or LUFS · S <n> for the short-term value. Below −70 LUFS it shows -inf. The fader runs −60 to +12 dB.
Use the peak bars to stay out of clipping and the LUFS number to match your overall level to something else — a backing track, a previous take, another player on the same desk.
The metronome click is mixed in after the master FX chain, so master reverbs, saturation and limiting never touch it. Set the click level in Settings → METRONOME, and give it its own output pair there if you want it in the in-ears and nowhere else.