
Hands on the guitar.
Footswitches, pedals, a knock on the body of the instrument — the Control page of Settings is where you decide what fires what, so the phone can stay in its stand for the whole set. The tuner is written up here too — in the app it sits in the Rig header, beside the gear.
08.1The control map
Settings → Control opens on the CONTROL MAP: every mapping the app answers to. Its blurb says what it takes: MIDI controls and input triggers, mapped to anything. Sources: any CC or note (use LEARN), a knock on the body, a held note or a chord. Below it are the taught sounds and, at the foot of the page, the MIDI devices in range.
The map is the whole map. There is no hidden factory layer underneath: the assignments the app ships with are ordinary rows in this same list, and every one of them can be moved to another control, pointed at another action or deleted. The rows are filed by what they do — Blocks, Parameters, Looper, Transport, Pads, Presets & system — each group collapsed until you tap it, with the number of rows beside its name.
A row you have moved off its factory control carries a coloured bar and a ↩ that puts it back; a row you added carries a bar in the other accent, and a group whose rows you touched says how many. The ↺ in the card header puts the whole map back to factory — your own rows go, the taught sounds and the mappings that listen for them stay. The header also has a presets chip and a + (Add mapping).
Every mapping is one row, read left to right: a source chip, a LEARN button, an arrow, an action chip, and an ✕ to delete the row. Saved maps live under Control Presets on the presets chip, so a pedalboard layout for one band need not follow you to the next.
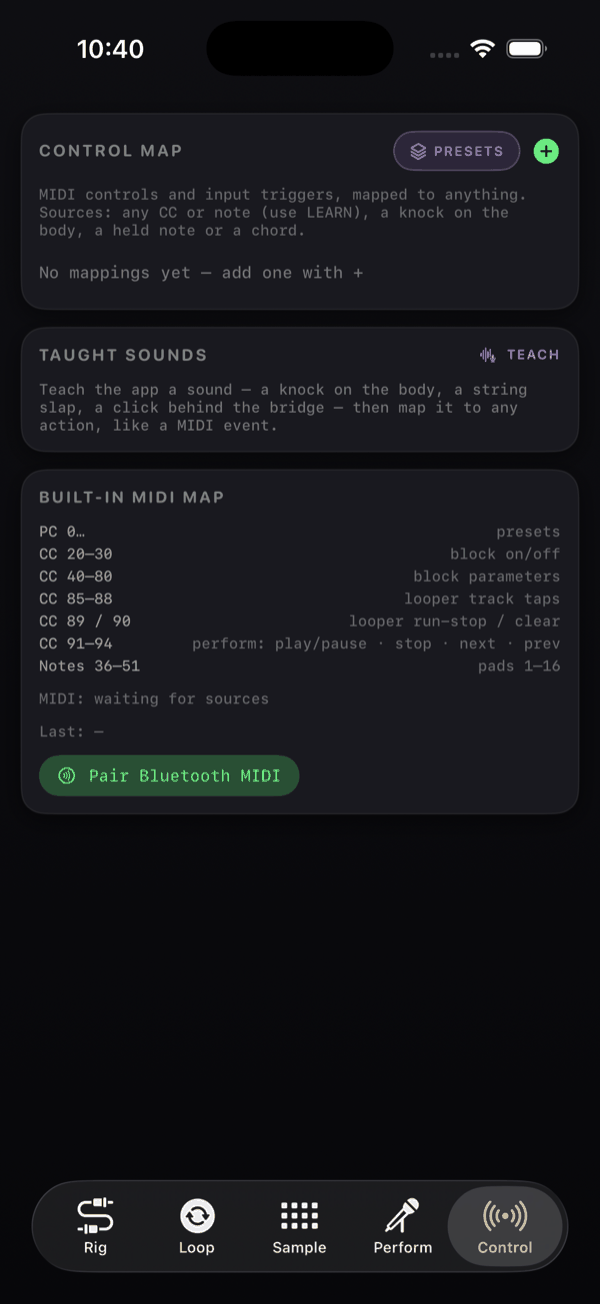
Only the first four rows driven by a taught sound are live. Add a fifth and the card warns you: Only the first 4 input triggers are active. MIDI rows have no such limit — this one is about listening to the instrument.
08.2MIDI learn
You never type a CC number. On a mapping row:
- Tap LEARN. The chip lights up and the row waits.
- Press the footswitch or sweep the pedal you want to use.
- The source chip fills in as CC 42 or Note 60, and the card's Last: line confirms it — Learned CC 42.
Tap LEARN again to disarm. The source chip's own menu has a MIDI section with CC… (use LEARN) and Note… (use LEARN), and a Taught sounds section listing the sounds you have trained plus Teach a new sound…
Learn in place
You do not have to start from the Control tab. Long-press almost any control in the app — a knob, a chip row, a looper pad, a sampler pad, the Perform transport buttons — and the menu offers MIDI Learn: <name> for that exact control. It outlines itself and shows MOVE A MIDI CONTROL…; move the pedal and the mapping is made. Cancel learn backs out if you grabbed the wrong knob. Once a control has a binding, the same menu offers Remove MIDI binding, which takes it off again.
Learn in place beats the Control tab for anything you can see: open the block, long-press the knob you want on the pedal, press the switch, done. The Control tab is for reviewing and tidying what you built.
08.3What you can map to
The action chip's menu, in full:
| Section | Actions |
|---|---|
| No action | Leaves the row inert. |
| Sampler pad | Pad 1 upwards, one per loaded pad. |
| Looper | Tap track 1…Tap track 4, Run / stop, Clear all; the transport's keys — Looper AUTO on/off, Click on/off, Swap playing and stopped loops, Bounce every loop, Save the loop, Every loop follows the tempo on/off, Every loop reversed on/off, Echo cancelling; and a submenu per cell, Loop 1…Loop 4, each action named for its cell (Loop 2 · Mute): Mute, Solo, Play / stop, Undo, Clear, Reverse, Play once, Follow tempo, Length ÷2, Length ×2, Next grid, Next speed, Fade in / out, Next fade length, Next multiply, Level, Pan, Transpose, Overdub decay, Start back a bar, Start back a beat, Start on a beat, Start on a bar, Record quantize, Next quantize grid, Max velocity, Save to the library. Level, Pan, Transpose, Overdub decay and Record quantize follow a CC's value, so they learn from a CC only. |
| Preset | Every rig preset by name, plus Next preset. |
| Perform | Play / pause, Stop, Next section, Prev section. |
| Per rig | Block on/off and Block parameter (CC), listed under each rig by name. |
Once you have more than one rig, three more entries appear: Next rig, Block on/off · Active rig and Block param · Active rig. Those follow whichever rig currently has MIDI focus, so one footswitch can bypass "the drive in whatever rig I am playing" instead of a fixed block in a fixed rig.
Two more groups arrived with the preset banks and the scene morph. Under Preset: Preset bank from value (0 is the factory bank, 1–3 the user banks), Next preset bank and Previous preset bank. Under Scenes, for a CC row: Morph with a pedal and a pair of scenes — the knobs glide between the two scenes' values as the pedal moves, and switches flip at the halfway point. See presets and scenes.
Two constraints are worth remembering before you wire a pedal:
- A continuous block parameter needs a CC. Notes and taught sounds are events — they cannot sweep a value — so the parameter submenu is hidden for those sources. An expression pedal sending a CC is what you want.
- Soft pickup after a rig switch. A continuous CC mapped to Block param · Active rig does not jump the knob when you change rigs. It waits until your pedal sweeps past the new rig's current value, then takes over — so switching rigs mid-song never snaps a parameter to wherever your foot happens to be.
08.4The built-in MIDI map
Before you map anything, a fixed layout is already live — plug a controller in and it works. All channels are accepted, because NAMper listens omni, and every source that appears is connected automatically. The app also publishes a virtual destination named NAMper, so another app on the same device can send to it.
| Shown as | Does |
|---|---|
| PC 0… | presets |
| CC 20–30 | block on/off — gate, comp, drive, amp, cab, phaser, flanger, chorus, trem, delay, cloud, in that order; a value of 64 or more is on |
| CC 40–80 | block parameters — 0–127 scaled into each parameter's range. CC 64 is skipped and left free for a sustain pedal |
| CC 77 / 78 | The Reverb's shimmer, scaled like any knob, and its freeze — a switch: 64 or more is on, below is off |
| CC 85–88 | looper track taps — tracks 1 to 4 |
| CC 89 / 90 | looper run-stop / clear |
| CC 91–94 | perform: play/pause · stop · next · prev |
| Notes 36–51 | pads 1–16 |
Your own mappings always win. If you learn a footswitch to CC 85, your row runs and the built-in track-1 tap on that CC steps aside — so you never have to work around the defaults, only over them.
The built-in CC 89 is a true run/stop toggle: it reads the looper's current state, stops it when it is running (a recording counts as running) and starts it from the top when it is stopped. A learned mapping on the Run / stop action behaves the same way.
Press detection is deliberately forgiving of cheap pedals. A message counts as a press when its value is 64 or more, and also when it is low but did not follow a high one — so a footswitch that sends every press as value 0 still fires discrete actions.
At the bottom of the card, one line tells you what NAMper can see: MIDI: waiting for sources or the names of the connected sources, with a Last: line under it showing the most recent event. If a pedal does nothing, look there first — it tells you whether the messages are arriving at all.
08.5Bluetooth MIDI
Wireless pedals pair from inside the app. At the bottom of the built-in map card, tap Pair Bluetooth MIDI. A sheet titled Bluetooth MIDI opens with the system pairing panel in it and a Done button. Put your pedal into pairing mode, tap it in the list, and it joins the MIDI sources line.
The sheet carries this caution for a reason: Tapping a device toggles its connection — a pedal already shown in the MIDI sources line is connected; don't tap it again. Tapping a connected pedal disconnects it. If you are unsure, check the sources line at the bottom of the card before touching anything.
NAMper asks for Bluetooth permission (Nearby devices on Android 12 and newer) the first time you open this sheet, and for nothing else. On Android the sheet does its own scanning: pedals in pairing mode appear in a list, and a tap connects them.
08.6Taught sound triggers
The TAUGHT SOUNDS card needs no hardware at all. You teach NAMper a noise you can make with the instrument in your hands, and from then on it fires any action, exactly like a MIDI event. The empty state puts it plainly: Teach the app a sound — a knock on the body, a string slap, a click behind the bridge — then map it to any action, like a MIDI event.
Teaching one
Tap TEACH and the sheet TEACH A SOUND opens with its instruction: Make the sound 3–5 times, the same way each time: knock the body, slap the strings, click behind the bridge — anything with a clear attack. Eight dots fill in as takes arrive, and the status reads Listening… and then the count. Give it a name in the Sound name field and tap Save the sound. Save needs at least two takes, and up to eight are averaged — more consistent takes make a more reliable trigger.
Each row shows the name, a usage count like 3×, a RE-TEACH button and a delete ✕. Tap the name to rename it. Re-teaching keeps the name and every mapping that points at it, so if a sound starts misfiring after you change guitars, re-teach it rather than starting over.
Delete a taught sound and every mapping that listened for it goes too. The usage count on the row tells you how many that is before you tap the ✕.
A taught sound can fire any action in the menu except a continuous block parameter — it is an event, not a sweep. And as on the control map, only the first four taught-sound mappings are active at once.
08.7The tuner
The tuner is not a tab. It opens from the tuning-fork icon in the Rig header, and it works whenever the audio engine is running — including when the feedback guard has muted the output, so you can still tune with the phone on its own speaker.
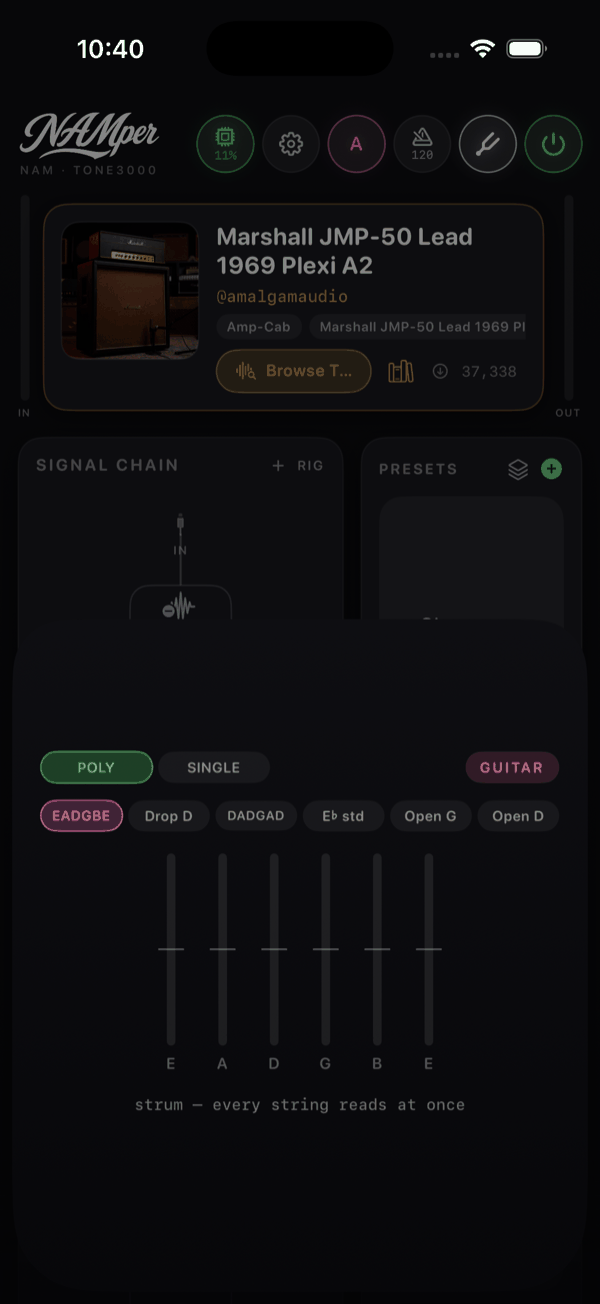
Two mode chips sit at the top, POLY and SINGLE. POLY is the default and the one to use on stage: strum once and every string reads at the same time, one vertical meter per string with the note underneath. Its caption says it — strum — every string reads at once. A string's dot goes green inside ±5 cents.
SINGLE is the classic one-note-at-a-time tuner: a big note letter, a needle across ±50 cents and a cents readout, going green inside ±3 cents. With no signal it shows play a note… Use it when you want to be precise about one string.
Instrument and tuning
The pill in the corner is the instrument: GUITAR, BASS or UKULELE. It is a choice, not a guess — tap it and pick from the menu. Guessing kept reading a bass E's harmonics as a guitar chord, so the tuner no longer tries to tell them apart by ear.
The tuning chips apply to POLY mode, and each instrument remembers its own choice:
| Instrument | Tunings |
|---|---|
| Guitar | EADGBE, Drop D, DADGAD, E♭ std, Open G, Open D |
| Bass | EADG, Drop D, 5-str B |
| Ukulele | GCEA, Baritone |
Reference pitch is fixed at A4 = 440 Hz. There is no calibration control, so if you play with an orchestra at 442 the tuner will not follow you there.