
Playing the set.
The Perform tab is the one you look at on stage: backing tracks, a setlist of songs, big stage buttons that switch sounds, a song's automation that plays back your moves off the timeline, a full-screen teleprompter for your words, and a recorder that captures the whole night in stems.
06.1Backing tracks
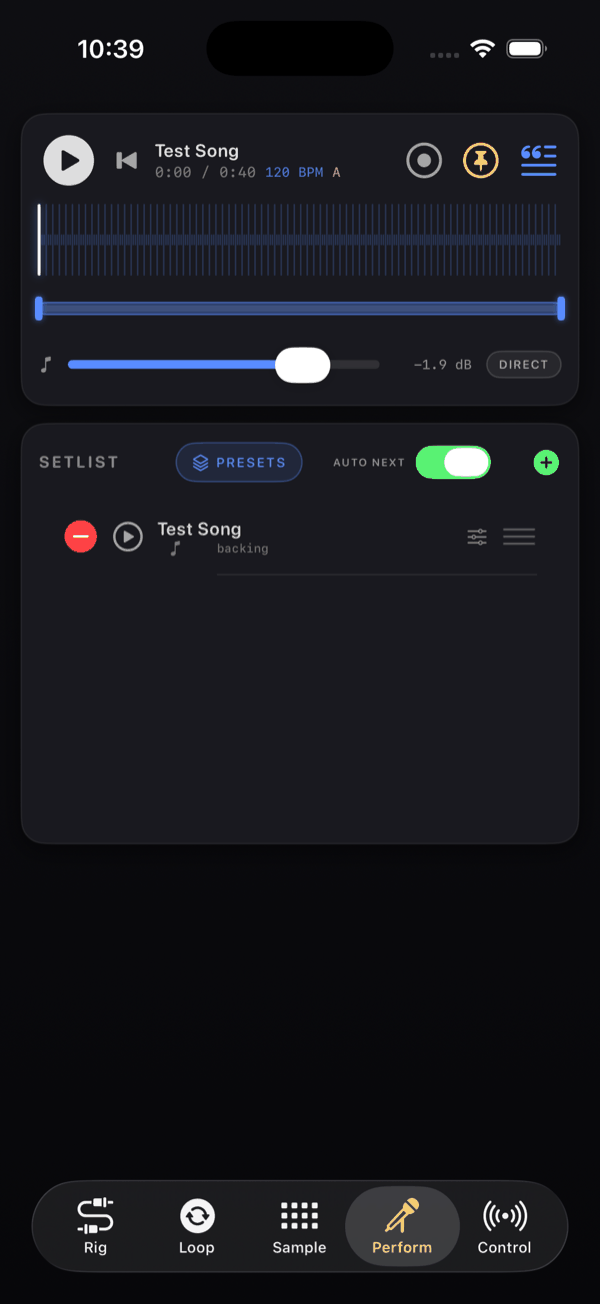
The + button in the SETLIST header (Import track) opens the Files picker. It is multi-select, so bring in a whole set at once, and it takes anything iOS can decode. Each file copies into backing/ and becomes a setlist section named after the file.
If a file cannot be read you get Could not import <name>.
Audio copied straight into On My iPhone → NAMper → backing/ with the Files app is adopted into the setlist the next time you launch NAMper — one paste on a laptop instead of twenty trips through the picker. See where your files live.
Names matter: re-importing a file with the same name replaces the audio already in backing/. Handy when you have re-bounced a track — and a trap if two different songs are both called Backing.wav.
06.2The player card
The top card is the transport. The name row shows the loaded track, or No track selected, with the time as m:ss / m:ss. Once NAMper has analysed the audio it adds the tempo — 120 BPM — and the key.
That analysis is not decoration. Selecting a track re-tunes the whole rig: the global tempo and key follow the song, so the delay and tremolo sync divisions, the looper's bar grid, the harmoniser and the autotune all land on the right song without you setting anything.
The card's keys, left to right — the first three are the same transport keys, in the same order, as the stage buttons' full-screen header. On a phone the automation and lyrics keys sit on the name row, and the transport keys with AUTO LYRICS on the row under it:
| Button | Does |
|---|---|
| To the start of the song | Back to the top of the song that is on; dimmed when the song has no timeline. An earlier song is a tap in the list |
| Play / Pause | One key: it pauses while the song plays and resumes where it paused. Stop — back to the top — is the song row's own button, or CC 92 |
| Next song | On to the next song without reaching for the list |
| AUTO LYRICS | Whether the teleprompter opens by itself with the song — the same switch as Open the lyrics with the song in Settings |
| Add to the automation | Put a point on the song's automation at the playhead, by hand |
| Record automation | Tap: write your moves onto the song while it plays. Hold: the switch and Clear the song's automation |
| Lyrics | Open the teleprompter, or load a lyrics file |
Long-press a transport key to MIDI-learn it — MIDI Learn: play / pause, MIDI Learn: stop, MIDI Learn: next section, MIDI Learn: previous section and MIDI Learn: next song are offered there. See MIDI & control.
Backing level and routing
Below the buttons, a console fader on its side sets the backing level in dB from −60 to +12, reading -inf at the bottom; a double tap brings it back to 0 dB. It is the same fader, and the same level, as the Backing strip on the Mix tab. The chip beside it is the routing: DIRECT sends the track out after the master FX chain (Direct out (after master FX)), which is what you want live — your reverb and limiter never touch the backing. PRE FX (Through master FX) puts the track through the master chain instead.
The timeline
The waveform under the card is a mirror-bar display with the played part lit and a cursor at the playhead. Tap anywhere on it to seek. Seeking also chases the song's automation: the preset, scene, switches and knobs the song has at that point are put in place, so jumping into the last chorus still gets you the last chorus's sound. The automation's lanes sit under the waveform.
There is no A/B loop region, no speed change and no pitch shift for backing tracks. If you need a song in another key or at another tempo, bounce it that way before importing.
06.3The stage buttons
The bottom half of the Perform tab belongs to a few big buttons — the ones a hand can hit mid-song without looking. What they hold depends on whether a setlist is LIVE:
- No setlist live — the four SCENES of the rig that is up. An empty scene captures what is playing, as the scene chips do.
- A setlist live, no song picked — the set's songs. The first tap picks one, and its sounds take the buttons.
- A song picked — the song's own entries, each a preset with the scene it carries, in the song's order. The one playing is lit — the light follows what plays: the button that matches the live preset and scene, after the automation, a seek or a scene change — and a button shows only the scenes its preset holds.
A button switches the moment the finger lands, not when it lifts, so a quick stab between two bars is never lost. There are four or eight of them: the count chip in the header toggles it, and until you choose, it follows the screen. The grid picks the shape that keeps the buttons closest to square. With more entries than buttons, the header's arrows step the pages, and the page follows the entry that is playing when the automation or a pedal moves the song on.
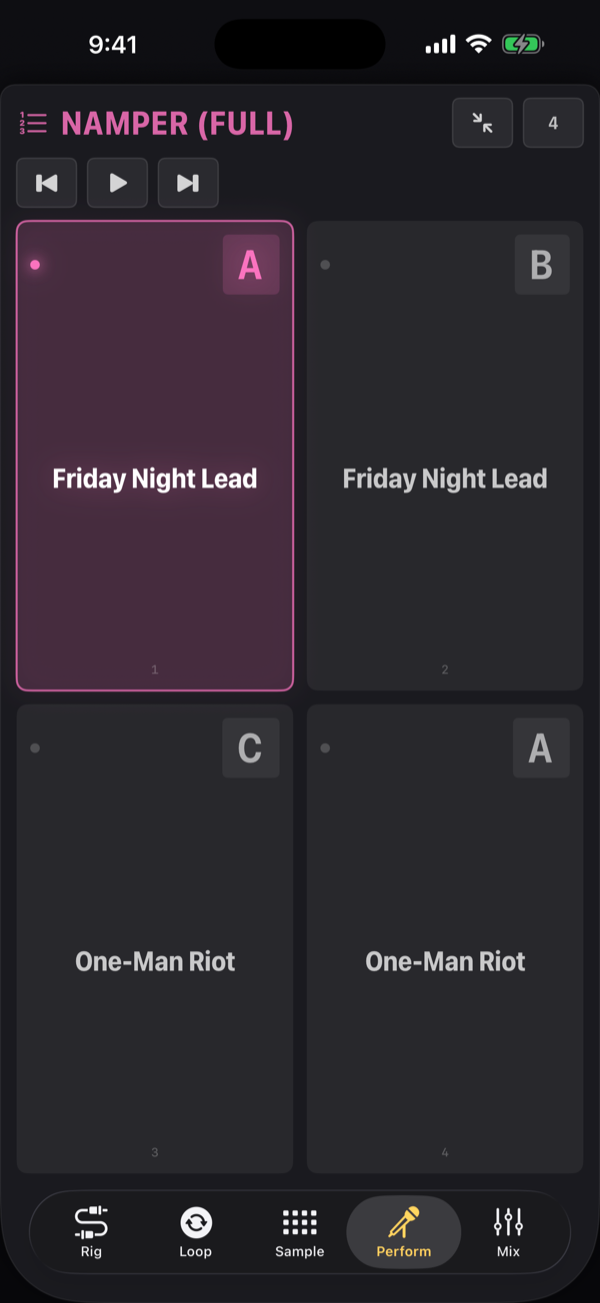
The expand button in the header gives the buttons the whole tab. Full screen, the song's name is large, and the player's keys come along beside it — to the start, play / pause and next song — since the player itself is out of sight.
Hold a button for its menu: the rig page's pad menu, on the stage — Replace sound…, Current rig, Clear pad and MIDI Learn, which binds a footswitch to that button by its number. The hold is deliberate (about 0.8 s), so it never gets in the way of a fast tap. Program change n presses stage button n while a set is live: the songs while none is picked, then the picked song's own entries.
06.4Setlists and songs
A setlist is a list of songs; one of them is LIVE at a time, and the live one owns the preset strip and MIDI — program change n presses stage button n. A song is a name, an ordered list of what it brings up, and an optional backing track with its automation and lyrics. A song with no audio at all is just as valid: it is the sound you play it with, cued from the same list.
The card header carries the SETLISTS button — just its icon on a phone — to create, pick, rename, share and delete sets — an AUTO NEXT toggle, and a + that imports audio files (one song each), adds a Song without backing, or builds a song straight From rig preset. With AUTO NEXT on, the set walks itself forward as each song finishes.
Each row shows a play button (Play song), the name, what the song brings up underneath it, and an edit button (Edit song). The list is always in edit mode: drag a row to reorder the set. A song leaves the set from its editor — Delete song at the bottom of the sheet.
Tap a song and NAMper applies everything it brings up, loads its backing track, takes its tempo and key, and points the transport at it — without playing anything. Set up between numbers, talk to the room, then hit Play when you are ready.
While a set is LIVE the Rig tab carries it beside the chain, so switching sounds needs no tab change: the preset rail becomes the set panel — the song stepper and one card per sound this song brings up, scenes included. See the rail's two faces.
A first launch with no setlists brings one: the song NAMper twice — the full mix and a play-along without the guitars. It is a worked example of this whole page. The song's automation switches the factory rigs One-Man Riot (verse, pre-chorus, chorus and a clean bridge as scenes, a second clean amp on a branch) and Friday Night Lead (solo and breakdown scenes, a sub-octave branch); the lyrics are pinned to their sections; and each song also recalls a looper preset of four 8-bar tracks and the FX & Textures kit. It is an ordinary set — rename it, add your own songs, or delete it, in which case it does not come back.
06.5What a song brings up
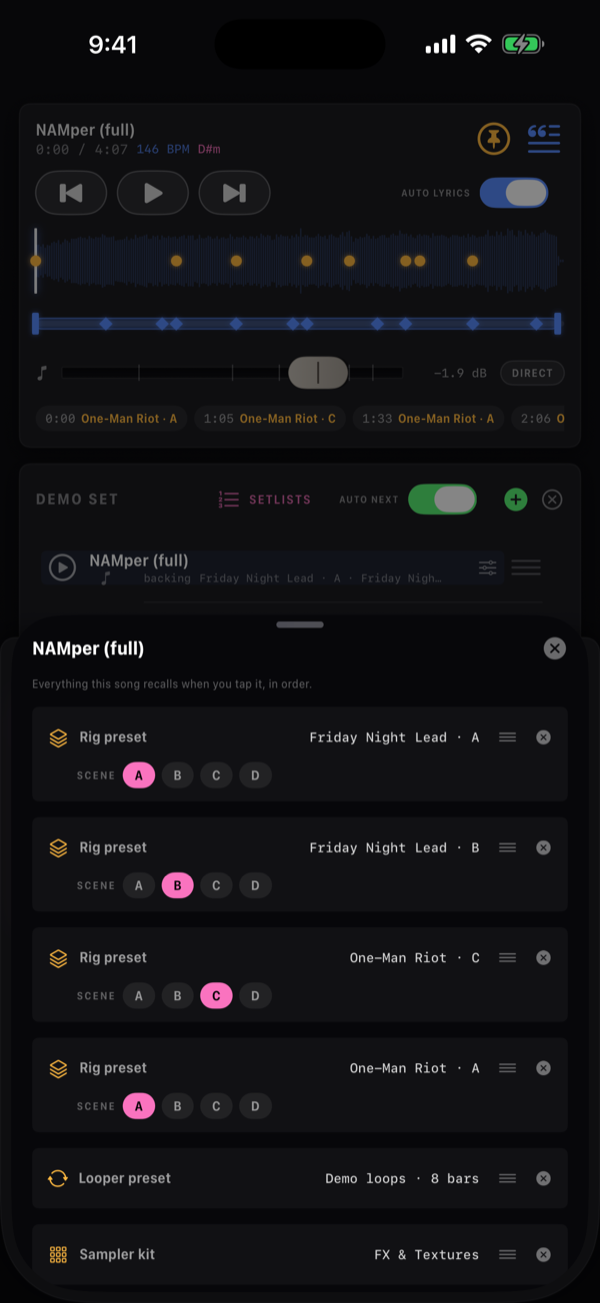
The edit button opens the song editor: a Song name field, a backing picker whose first entry is Song without backing, the lyrics row, the list of what the song recalls, and Delete song at the bottom.
A song with no backing track also gets a Length row — the timeline it runs on. Set one and the transport counts it out on a clock instead of on audio: the words scroll across it, its automation plays on it, and the song ends when the length does, so AUTO NEXT carries the set on. Left at no timeline the song is a bare recall: it arrives armed and waits for you.
Add a preset, a looper, a kit… puts one entry on that list:
| Entry | What it recalls |
|---|---|
| Rig preset | A preset with its SCENE — A–D, or - for the preset as it was saved. The same preset can appear twice on two different scenes. |
| Looper preset | Track lengths, routing and pans for the looper — the recorded audio is yours to play. |
| Sampler kit | A kit for the sixteen pads. |
When the song is cued, the first rig preset on the list is the sound you start the song with; the ones below it are there for the automation, the stage buttons and a footswitch to reach, and the order is what next / prev preset in song steps through. To reorder, drag a row by the grip — the three lines at its right edge. A row's scene letters offer only the scenes that preset holds, and tapping the chosen letter again clears the choice.
Picking a preset
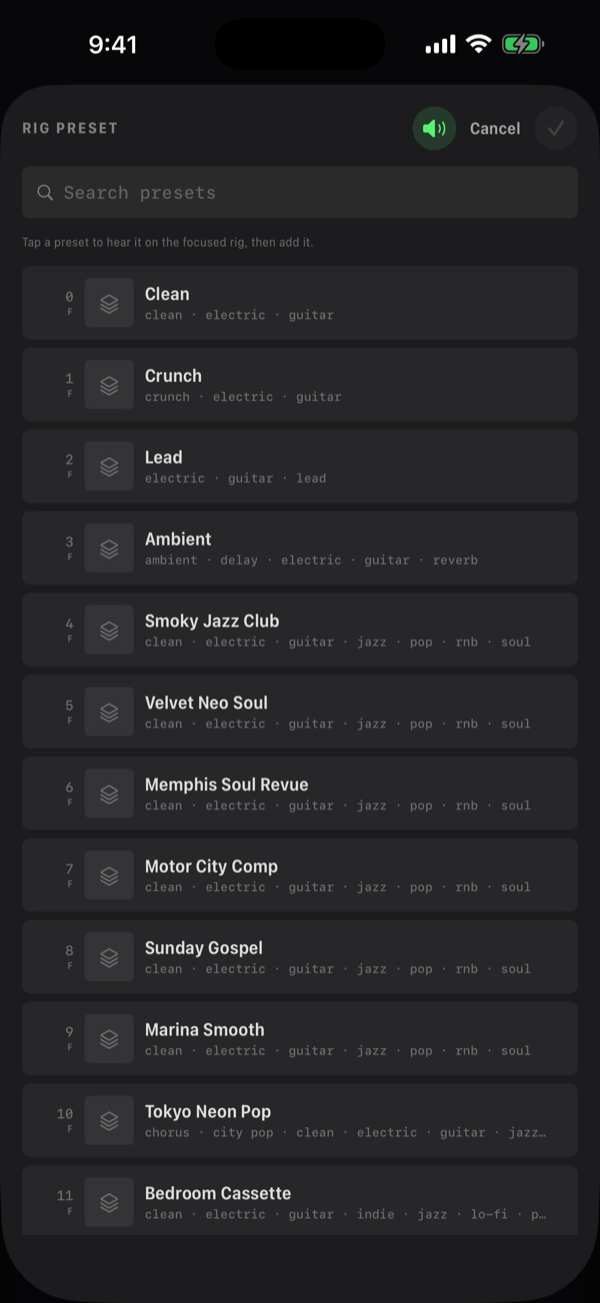
The rig-preset picker shows the same numbers as the preset rail — 0 … 127 — for every bank in one list, the factory's first, each row marked with its bank and carrying its cover and tags; the search field filters by name, number and tag. It monitors while you browse: tap a row and the rig actually loads it, so you choose the sound with your ears (the speaker in the picker's header turns that off). The checkmark adds the highlighted preset; close the picker without choosing and the rig goes back to what it was.
The other direction works too: the row menu on a preset in the Rig tab's rail has Assign to set… — pick a setlist, then one of its songs or New song, and the preset is appended to that song's list.
06.6Song automation
A song remembers what you did while it played — a knob turned, a block switched, a scene or a preset brought up, a pad hit, a looper key, a fader moved — on its own timeline, and does it again every time the song plays. Clean verse, crunch chorus, the delay opening up for the solo: played once, then hands-free.
It replaces the markers of earlier versions. What a marker did — bring a preset and its scene up at a moment — is now a point on the song's Preset lane where the preset changes and a point on its Scene lane where the scene changes, and a song's old markers are moved in once, by themselves.
Recording
The record key — the circle beside the add key on the player card, Record automation — arms it. Tap it and every move is written onto the song while the song plays: from the next play on, or at once if it is already playing. The key lights red while it records. Hold it for its menu: the same Record automation switch and Clear the song's automation, which asks once more before it goes.
| What is written | From |
|---|---|
| A knob, a block's on/off, a scene, the scene morph | The screen, a pedal, a plug-in host. A sweep keeps a point every 20 ms at most, and none for a move under 1/500 of the knob's range, so a hand held still writes nothing |
| A rig preset with the scene it lands on, a looper preset, a pad kit | A tap on the song's entries — the stage buttons, the set panel, a pedal |
| Pad hits and stops, with how hard | The screen, a key, a pedal |
| The looper's keys | Record/play, arm, mute, solo, clear, a cell's stop/play, undo, peel, fades, the swap, stop/play all |
| The mixer | Every strip's level and pan, and the sends |
What a preset or the tempo sets on its way in — a synced delay's time, say — is not a move and is not written, and neither is the automation's own playback.
A knob's, a fader's or the morph's lane is overwritten only while you move it, and for 0.6 s after your hand comes off. The rest of that lane, and every lane you do not touch, stays as it was and keeps playing — so a second pass can fix one knob in the chorus without redoing the song.
A lane of steps — a preset, a scene, a block's on/off, a looper preset, a kit — is taken over from your first press on it until the recording stops: the song stops or is moved, or you tap the record key off. What it held in that stretch gives way to what you press now instead of piling up beside it. Before your first press and after the recording stops the lane stays as it was, so tapping the record key off is the punch-out.
Playback needs no switch: the automation runs whenever the song plays. A start or a seek chases the song's state — preset, scenes, switches, knobs, faders — so the sound is right wherever you drop in. Pad hits and looper actions are events: they fire only when the song passes them. A preset that is already up is not loaded again.
The lanes
Under the timeline, each thing the song moves gets a lane of its own, its name at the right:
- A knob, a fader or the morph draws its curve, across its own range.
- A step lane draws a tick at each point with its words beside it: Preset the preset's name, Scene the letter, a block's on/off lane On or Off, Looper preset and Sampler kit their names.
- Pads shows which pad is hit; Looper the action and its cell — Stop/Play 2, Mute 3.
A point's words take the room up to the next point, and are cut short where points crowd. With more than four lanes the rows scroll.
Zoom
A one-second sweep on a four-minute song is a step at the width of the whole song. Pinch the lanes, or tap the magnifier at their top left (Zoom: 1×, 4×, 16×, then back to the whole song), and they show a stretch of the song around the playhead — following it as the song plays, the playhead drawn as a line. Tapping and dragging points work on the zoomed view as on the whole one.
Editing a point
- Tap a lane of steps — a preset, a scene, a switch, the pads, the looper — and its nearest point opens. At the top is when it happens: −BAR, −BEAT, +BEAT, +BAR, or To the playhead. Under it, what it is — the song's preset, a scene, On or Off, a pad with Hit or Stop and its VELOCITY, the looper's ACTION and CELL. The trash key deletes the point.
- Drag a point along its lane to move it. When the song's tempo is known, it lands on the song's beats.
- A curve — a knob, a fader, the morph — is not edited point by point: record it again to change it.
A lane's events
Hold a lane and its events come up as a list, in time order: each one's time and what it is. On a lane of steps, tap an event to open it as above, or its trash key to delete it. A curve shows how many POINTS it has, the SONG TIME it covers and the range of its VALUES — A curve changes only when it is recorded again. Delete this lane at the bottom removes the whole lane, after asking.
Adding a point by hand
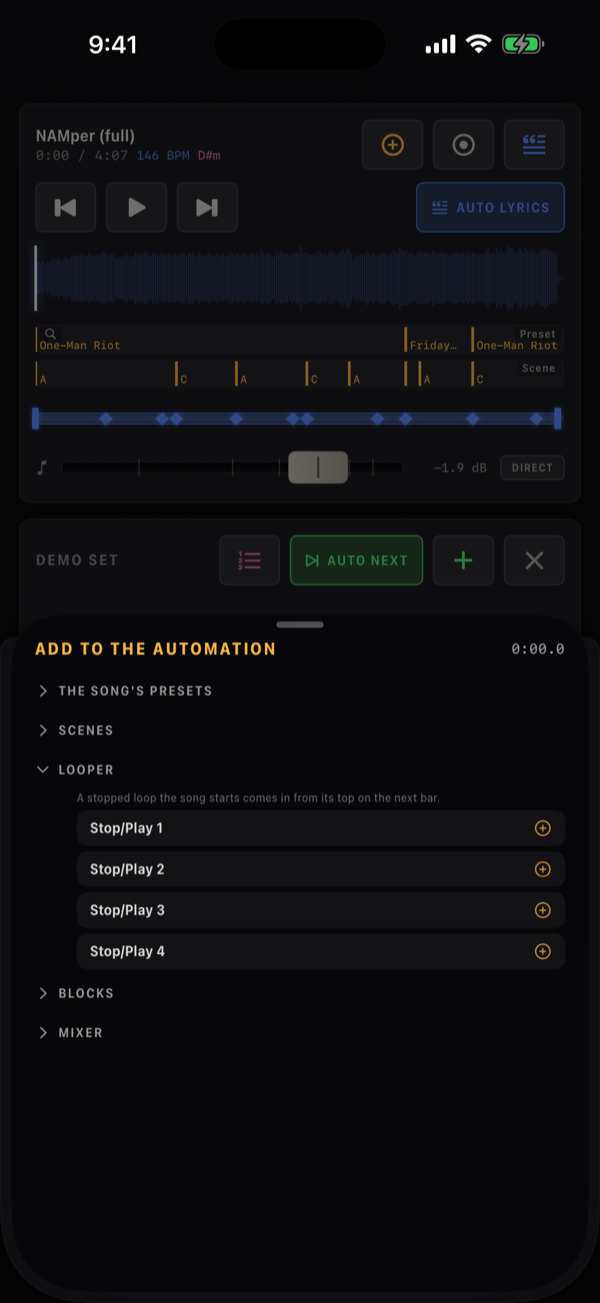
The add key (Add to the automation) puts a point down at the playhead without recording anything. Its sheet, ADD TO THE AUTOMATION, shows the playhead's time and a folded tree — each level opens with a tap:
| Group | Opens to |
|---|---|
| The song's presets | The song's own entries: a rig preset with its scene, a looper preset, a kit |
| Scenes | The scene each rig is on now |
| Looper | Stop/Play 1 to 4 — see below |
| Blocks | Rig → block → its On/off and each knob, with the value it has now |
| Mixer | Strip → level and pan |
A choice puts the point down with the value it has now and opens it right there in the sheet, to type or slide the value — a knob's or a fader's VALUE has a slider and a field in the parameter's own units, held to its range — and move the time. A lane the song does not have yet is made for it. Both automation keys are dimmed while the song has no timeline — no backing track and no Length.
Loops as song sections
A looper point that starts a stopped cell brings that loop in from its top on the next bar line, not in time with wherever the cycle happens to be: a verse loop, then a chorus loop, each starting where it starts. The sheet says so under the Looper group — A stopped loop the song starts comes in from its top on the next bar. A cell you start by hand stays in time. See the looper.
The automation is kept beside the song's track, as <song>.auto.json in backing/.
06.7Lyrics and the teleprompter
NAMper carries your words for you. Give a track a plain text file and it becomes a full-screen teleprompter that opens by itself when the song starts and scrolls at the pace you taught it.
Loading lyrics
Words do not need audio under them. A song with no backing track keeps its own lyrics — load them from the Lyrics row of its editor — and once the song has a Length, they scroll on that timeline exactly as they would over a track, anchors and all. Attach a backing track later and the words move onto it.
There are two ways in.
The reliable one: Load lyrics from file…, either from the lyrics button's long-press menu or from a setlist row's context menu. It takes plain text. If the file cannot be read you get Could not read the lyrics file.
The automatic one: when you import audio, NAMper looks for a plain .txt (or .text) file with the same base name sitting next to it — Song.wav and Song.txt — and picks the text up as that song's lyrics. Prepare a folder that way on a computer and a whole set arrives with its words attached.
The file picker's permission scope does not always cover the file next to the one you chose. When it does not, nothing is picked up and no error appears — the track simply has no lyrics. Check the lyrics button after importing, and fall back to Load lyrics from file… for anything that came up empty.
The lyrics button carries a quote-mark icon and is tinted when the track has words. A tap opens the full-screen lyrics if there are any and otherwise opens the file picker; a long-press gives you Show lyrics, Load lyrics from file… and Remove lyrics.
Loading new lyrics onto a track resets the window to the whole song and clears every anchor. Fix typos in the file before you spend a rehearsal anchoring it, not after.
The lyrics strip
Once a track has lyrics, a tinted band called Lyrics range appears under the waveform. Its edges are the lyrics window: where the text starts scrolling and where it finishes. Drag an edge to move one bound, drag the middle to slide the whole span — useful when a song opens with a long instrumental intro.
Anchors are drawn on the same strip as small diamonds. Drag one to retime it; long-press one for Delete anchor.
The teleprompter
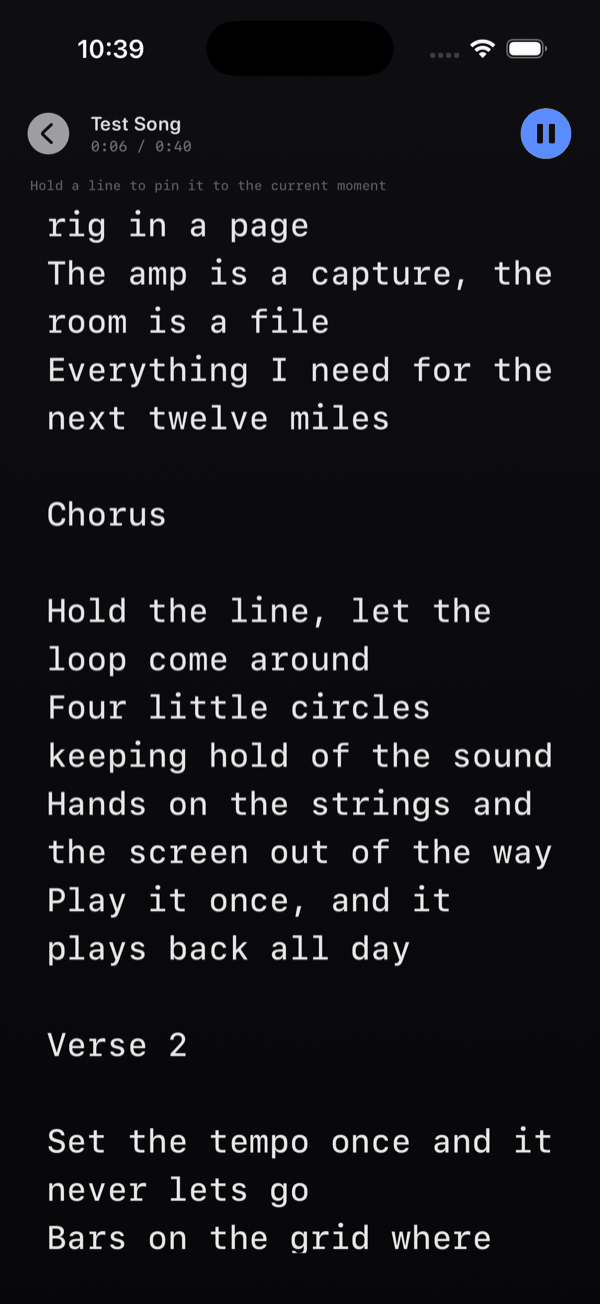
The teleprompter is a full screen, and it opens by itself when playback starts on a track that has lyrics. Its header holds a back button, the track name, the m:ss / m:ss readout and a play/pause button. Tapping anywhere on the screen toggles play/pause — you do not have to find a small target with a guitar in your hands.
Opening itself is a switch: AUTO LYRICS beside the lyrics button on the player card, the same switch in the lyrics button's menu, and Settings → Stage → Open the lyrics with the song. Off, the tab you were on stays where it is, and the Lyrics button opens the words when you want them.
Anchors
An anchor is how you teach the text your song. Hold a line for about a third of a second and it is pinned to the current moment. Hold an already-anchored line to remove the anchor. An anchored line is marked with a filled bar in its left margin.
An anchor means one thing: at this time, this line is the one being sung. Nothing is lit for it: every line is drawn at the same brightness, and only the anchored ones keep their coloured bar in the left margin. Which line is being sung is inferred from the anchors and the reading weight, so it is a guess, and a guess one line out sends the eye to the wrong words — worse than no highlight at all. The page still glides so that line sits about a fifth of the way down — never flush with the top edge — so there is run-up above it and the next lines are already in view. Between anchors the words move a line at a time, measured in reading time rather than in pixels: a blank line costs nothing, a wrapped line costs the room it fills, and a long instrumental leaves the page waiting on its line instead of crawling through the verse ahead of the singing. It can never scroll backwards, even if you place anchors out of order — a teleprompter that jumps back mid-verse is worse than one that is slightly early.
In practice: play the song once in rehearsal and hold each section's first line as you reach it. Four or five anchors are usually enough for a three-minute song, and they are saved with the track.
With no anchors the words walk the text evenly, line by line: the first line at the start of the lyrics window, the last at the end of it. A hint reads Hold a line to pin it to the current moment until you place your first one. If the text is shorter than the screen it does not scroll at all — it is centred.
Taking over by hand
Drag the text and you take control: the auto-glide stops and the words follow your finger. The moment that happens an AUTO chip appears in the header (Resume auto-scroll); tap it to hand control back and the text re-aims at the playhead. That chip is only visible while manual scroll is active, so if you cannot see it, nothing is being held. Leaving the screen and coming back also resets to automatic.
Text size
Settings → LYRICS holds a text-size slider from 16 to 34 pt, default 22 pt, with a live preview reading This is how your lyrics will look. Changing it re-aims the teleprompter live. Set it for the distance the phone actually sits from your face on a mic stand. See the settings reference.
The same card carries Open the lyrics with the song.
06.8Perform presets
The PRESETS chip in the setlist header opens Perform Presets. A saved perform preset carries the whole setlist: every section with its steps and bars, the AUTO NEXT state, and the lyrics — text, window and anchors — of every track that has them.
What it does not carry is the audio. Backing tracks are stored as file-name references, so a preset stays small and can be shared. Load it on another device and the sections whose backing file is not present fall back to steps only; the lyrics for the tracks that are present are written back to disk as usual.
Copy your backing/ folder across first, then load the perform preset. Same file names, same set.
06.9Recording
The recorder on the Mix tab captures the performance as three aligned stems. It refuses with Audio is off — tap the power button before recording. if the engine is not running.
| Stem | What it holds |
|---|---|
| mix | The master: rig, looper, sampler pads and backing together — the click is left out |
| input | The dry sound-card input, at whatever channel count your interface delivers |
| backing | The backing track alone, when one is attached |
The dry input stem is the one that saves a good take with a bad amp choice — re-amp it later. Looper tracks are not separate stems; they are inside the mix.
Files land in recordings/ named Perf yyyy-MM-dd HH.mm.ss mix, … input and … backing. They are .m4a normally and .caf for high-rate or multichannel material. Switching backing track mid-take opens a numbered segment — … backing 2.
Three errors can stop a take: Recording could not start: the take file could not be created., Recording stopped: the device is out of storage space. and Recording stopped: the take file could not be written.
06.10Recording projects
The RECORDINGS card groups the stems of one take into a project, by their shared Perf <date> name. Newest first, and the five newest projects are shown — older takes stay on disk in recordings/, reachable through the Files app.
A project row has a preview button that plays the mix stem, the project name, a share button (Export DAWproject), a delete button (Delete project) and a chevron (Show stems). Tapping the row expands it too.
Expanded, each stem gets its own row labelled mix, input, backing or backing 2, with Share recording and Delete recording. Share a stem to send someone a rough mix; share the project to open the take in a DAW.
06.11DAWproject export
The share button on a project row — not on an individual stem — exports the whole take as a .dawproject file through the normal iOS share sheet: Save to Files, AirDrop it to a Mac, drop it in a cloud folder. DAWproject is an open interchange format, so any DAW that reads it will open the take without a converter.
Inside you get one track per stem, named after the stem, each with a single clip starting at 0 — so everything lines up the moment the project opens. The audio is written as 24-bit WAV at the original sample rate and channel count.
No tempo and no time signature — the timeline is in seconds, not bars. No setlist, no plugin state and no automation. It is a clean multitrack of the audio you played, and you will set the session tempo yourself at the other end.