
Four tracks, one cycle.
The Loop tab is a four-track sync looper with an analysis engine behind it. Lay down the first loop and everything else falls in behind it — and with AUTO on, NAMper finds the bar lines for you.
04.1How the looper thinks
One rule sits underneath everything else: the first loop sets the cycle, and every other loop syncs to it.
Whichever cell you record first defines the cycle. Every other cell is fitted to it: its length moves in steps of the first loop — a quarter, a half, twice, four or eight times as long — so it never drifts out of phase. There is no mode to pick. Nothing shifts the cycle afterwards except editing the cell that set it, or clearing everything and starting again.
There are four cells, and a loop is as long as you play it: past the first minute a cell keeps growing for as long as the device has the memory for it. With the screen upright the transport sits on top and the four cells fill the page two by two; turned on its side, the transport becomes a column on the left and each cell's settings stand beside its pad. The iPad follows the same rule by the shape of the page, not by the device.
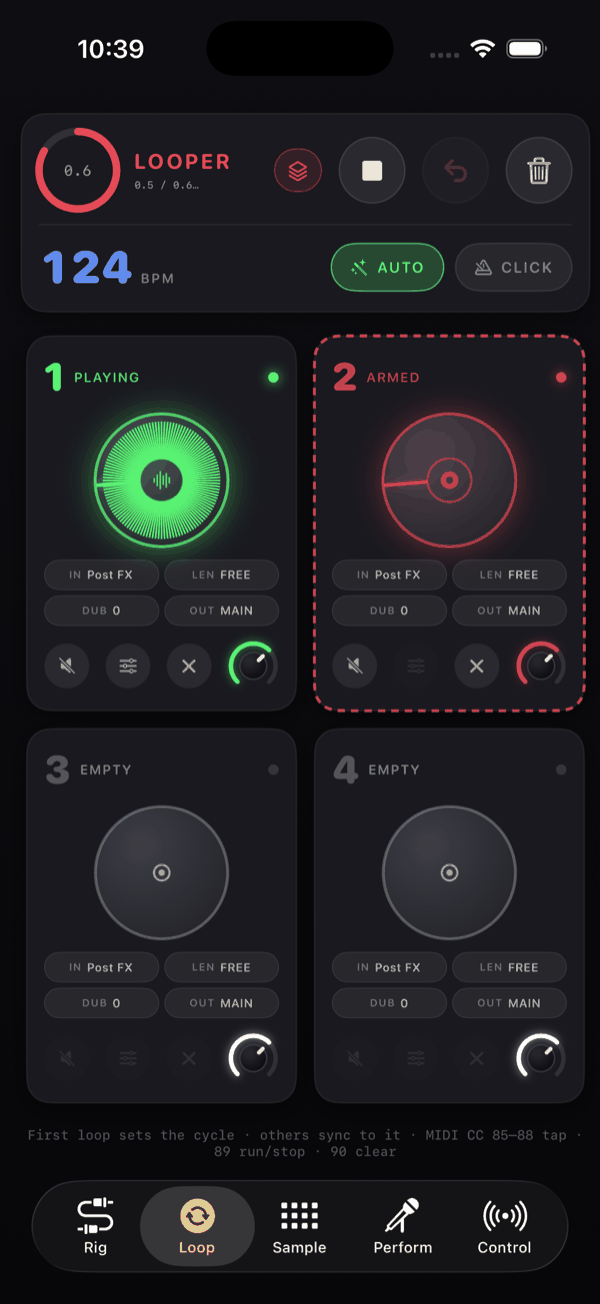
Every cell is built the same way: the round pad in the middle of a square, a corner key in each of the square's four corners, and a strip of settings tiles — under the pad, or beside it when the cell is wider than tall. There is no card and no header: the cell's number is drawn huge and faint across its own circle.
04.2The loop cells
The pad draws the loop's waveform as a ring — one lap of the circle is one lap of the cell's own loop — with a beam marking the play position. Loud passages make the ring thicker, so you can read where you are in the loop from across a room. The pad also lights from its rim inward as the loop sounds, the deeper the louder.
While the very first loop records there is no cycle yet, so the ring behaves differently: the whole circle maps to everything recorded so far, the beam holds still at 12 o'clock — that is the write head — and the centre counts the elapsed seconds. Once the loop closes, the beam runs the cycle. A cell recording into a running cycle draws its wave as a growing arc.
The centre also says how the loop plays when that is not plain: REV for a reversed loop, its speed (×½, ×2…), 1× for a loop that plays once, and L2, L3… for the layers on top of the take. A fade running shows its direction and how far it has gone.
Tapping the pad
Only the circle takes the tap. One tap moves the cell one rung up the ladder:
- empty → recording
- recording → close the loop, and it starts playing
- playing → overdub
- overdub → back to playing
- muted → playing
With AUTO on, tapping an empty pad arms it instead of recording immediately — a dashed red ring goes round the cell — and tapping an armed pad cancels the arm. That is the only change AUTO makes to the ladder.
The corner keys
| Corner | Key | What it does |
|---|---|---|
| Top left | Mute | Silences the loop while it keeps running; lit amber while on. |
| Top right | Solo | Mutes the other playing cells; press again to bring them back. Soloing another cell hands the solo over. |
| Bottom left | Undo | Steps this cell back one layer per tap, down to the take and past it: at L1 it clears the cell — see Undo and clear. |
| Bottom right | Play / Stop | Stops or starts this loop alone. |
A key that has nothing to do on the cell's current state is drawn faint. The corners light with the loop too, a little shallower than the pad.
Stopping one cell does not stop time: the loop runs on silently with the cycle, and pressing Play brings it back exactly in time, never from its start. With the whole looper stopped, a cell's Play starts the looper with that cell alone; the transport's play brings every cell back.
States
| State | What you see |
|---|---|
| Nothing recorded | Faint rim, no wave |
| Recording | Red |
| Playing | Green |
| Overdub | Orange |
| Muted | Amber, the wave dimmed |
| Stopped on its own | In the ink colour, the wave still drawn |
| Armed (AUTO) | Red, dashed ring round the cell |
MIDI learn
Every piece of a cell learns on its own long press, and learns only itself: the pad offers MIDI Learn: tap loop track 1 (2, 3, 4) — that is how a footswitch gets bound to one cell — and each corner key offers its own action, Loop 1 · Mute, Loop 1 · Solo, Loop 1 · Undo, Loop 1 · Play / stop. The same goes for every row and chip in the loop editor. A cell's level learns from the editor's Level knob: the level key's own press moves the level.
04.3The transport
The transport has no title — the tab already names the page. Upright it is two rows: a row of icon keys, and under it the tempo, AUTO and CLICK. On its side the same pieces stand in a column: the tempo with the speed key beside it, AUTO and CLICK, and the keys two by two at the foot. The card lights up while the first loop records.
| Key | What it does |
|---|---|
| Presets | Looper Presets — the cells' setup; see what gets saved. |
| Library (the books) | The saved loops, and loops in and out as files — see the library. |
| Bounce | BOUNCE LOOPS: the loops you pick become one, mixed as you hear them now. Let the tails ring over the loop point and Keep the source loops (which needs an empty cell to bounce into). Faint while there is no audio loop. |
| Settings (the gear) | What acts on every loop at once — below. |
| Speed | Every audio loop's speed — below. |
| Swap | Swap playing and stopped loops: every sounding cell fades out while every stopped one fades in, over the crossfade length. Lit only while some cells play and some are stopped. |
| Play / stop | Play loops / Stop loops, disabled until there is a cycle. It swaps its icon; its colour stays. |
| Trash | Clear all loops. |
There is no undo in the transport: undo always names its cell. A key's long press is its MIDI learn — play for MIDI Learn: looper run / stop, the trash for MIDI Learn: clear all loops, and so on.
The gear
The gear opens a menu of what acts on every loop:
- Every loop follows the tempo / No loop follows the tempo — a loop that follows plays at the set tempo with its pitch kept.
- Reverse every loop / Every loop forward.
- Echo cancelling — the same switch as in Settings → Audio; see the room.
- Crossfade length — what the swap fades over: 1 beat, 1 bar, 2 bars or 4 bars; 1 bar unless you change it. A cell's own fade keeps its own length.
The menu's items learn from Settings → Control, where the actions Every loop follows the tempo on/off, Every loop reversed on/off and Echo cancelling are in the Looper group.
The speed key
The speedometer holds every audio loop's speed. Hold it and a scale from ×½ to ×8 comes up with its thumb under your finger; drag up or down and every loop takes each speed as the thumb passes it, heard as you go; let go and the scale is gone. Two quick taps put every loop back at ×1. While the loops are not at ×1 the key is lit, with the speed in its corner. Its press is its own, so it has no MIDI learn; a cell's Next speed is mapped in Settings → Control.
The built-in MIDI map covers the looper with no setup: CC 85–88 tap cells 1 to 4, CC 89 runs and stops, CC 90 clears. CC 89 is a true toggle — see MIDI & control. For a board of switches, recall Four-Switch Loop Deck from the presets on the Control page (it replaces the map): CC 80–83 tap cells 1–4, CC 84 run/stop, CC 86 clear all, CC 87 AUTO, CC 88–91 play/stop cells 1–4, CC 92–95 undo cells 1–4, CC 96 the click, CC 97 the swap and CC 11 cell 1's level.
04.4AUTO mode
AUTO — the wand chip, next to CLICK — does two jobs: it starts and stops takes for you, and when the master loop closes it works out where the bar lines actually are.
Arming instead of recording
With AUTO on, tapping an empty pad arms it: a dashed red ring goes round the cell. What happens next depends on whether there is already a cycle:
- No cycle yet. Recording begins on your first note above the arm threshold — Settings → Stage → LOOPER → Signal that starts an auto-loop, −40 dB unless you move it, lower being more sensitive. A brush of the strings or the room stays under it. You can pick the guitar up, get comfortable, and the take starts when you play — not when you tapped. With a MIDI clock coming in, it starts on the clock's next downbeat.
- A cycle already running. Recording begins on the next cycle boundary, so the take starts exactly on the bar. A short grace window forgives an attack that lands slightly late, so hitting the downbeat a hair behind the beam still counts.
A free armed take — one recorded with no cycle in place — also stops itself when the phrase does: once the quiet has lasted the beats set in Silence that closes an auto-loop (one unless you change it) and outlasted the rests in your own playing, the take closes on the bar end it heard. With no tempo to hear — a drone, a pad — two seconds of quiet close it instead. Reverb tails and gaps between phrases do not count as silence, so a sparse riff is not cut in half.
With a loop already playing out of a combo amp into your pickups, or out of a speaker into a mic, an armed cell learns how much of that loop comes back, and when — a speaker and a mic hear it a round trip later — and waits through it, so the loop's own echo does not start the take: a note has to rise clearly above it, about 9 dB, so play it rather than brush it.
After each loop closes, AUTO arms the next empty cell by itself, so you can build up all four tracks without touching the screen again.
Boundary snapping
When the master loop closes, NAMper analyses the clean input — the signal before your effects — and looks for attacks. It fits a bar grid to them, then:
- Trims the end to the bar that contains the last attack, so a take that ran a beat and a half long becomes a whole number of bars.
- Rotates the loop so it begins on the first beat. The string noise, the breath and the finger squeak that happened before your downbeat are moved round to the end of the loop, where they belong musically.
- Folds the detected tempo into the 70–180 BPM range, so a fast strum is not read as 240 BPM and a slow one is not read as 45.
On screen it all happens in one moment: the ring re-draws, the length snaps to a clean figure, the BPM readout — blank until now — fills in, and a FREE cell's LEN tile shows what the take came out as, AUTO · 4. From there the click, the LEN tiles, the sampler's quantize and the setlist's bar clock all have a grid to work from.
With CLICK on — or a song cued, or a MIDI clock coming in — the tempo is locked to whatever tempo is set and only the phase is fitted. That is the mode to use when you are playing to a click or to a backing track and the tempo must not move.
If there is no usable grid to find — a sustained pad, a freely-timed intro, a bowed swell — NAMper does not force one. It falls back to trimming at the last attack and picking a whole number of bars. You get a clean loop, just not a re-detected tempo.
Snapping runs on the master loop, and everything recorded afterwards inherits its grid. If the first take lands wrong, fix it in the loop editor before layering, or clear and record it again — nudging track 3 will not move the bar lines.
04.5Tempo and the click
The tempo block on the Loop tab shows a big number captioned BPM. With no tempo set it reads SET TEMPO over a —. Tap it for the tempo sheet.
The sheet has a numeric field (placeholder 120, range 20 to 300) with BPM beside it, a large TAP button that reads again… after your first tap, plus Clear (AUTO re-detects) and Done. Clear it when you want AUTO to work the tempo out from your playing instead. The sheet also names who holds the tempo: from the clock, from the song, from the loop or set by hand.
They are ranked in that order. A MIDI clock coming in outranks a cued song, a song outranks a loop closed in AUTO, and a tempo you type is the weakest: it always lands, and the next song or AUTO loop takes the tempo back. A weaker source never rewrites a stronger one — a loop recorded under a song is snapped to the song's tempo instead.
The same sheet is reachable from the Rig header: the metronome chip toggles the click on a tap and opens SET TEMPO on a long-press.
CLICK turns the metronome on. Turning it on with no tempo set forces 120 BPM and restarts the bar, so switching the click on is never a neutral act. Click level and the click's output bus live in Settings → METRONOME, where it can have its own output pair for in-ear monitoring.
A first take with LEN set in bars reads the clock the same way. With no clock running — the click off, no song, no MIDI clock — you play it free and its bars set the tempo when it closes. On a clock it closes after that many bars and goes straight on into overdub, until you tap.
Tapping record starts recording. If you want a bar of click before you play, either arm the pad with AUTO and let your first note start the take, or record the first loop against a cycle that is already running.
04.6The loop editor
Open it with the edit tile (the sliders, Edit loop N) among a cell's settings. It works on an empty or armed cell too, so the grid, the preset a take records through and, on a MIDI cell, the quantize can be set before you play. The sheet is headed LOOP N with a live length label, and is as tall as what it holds.
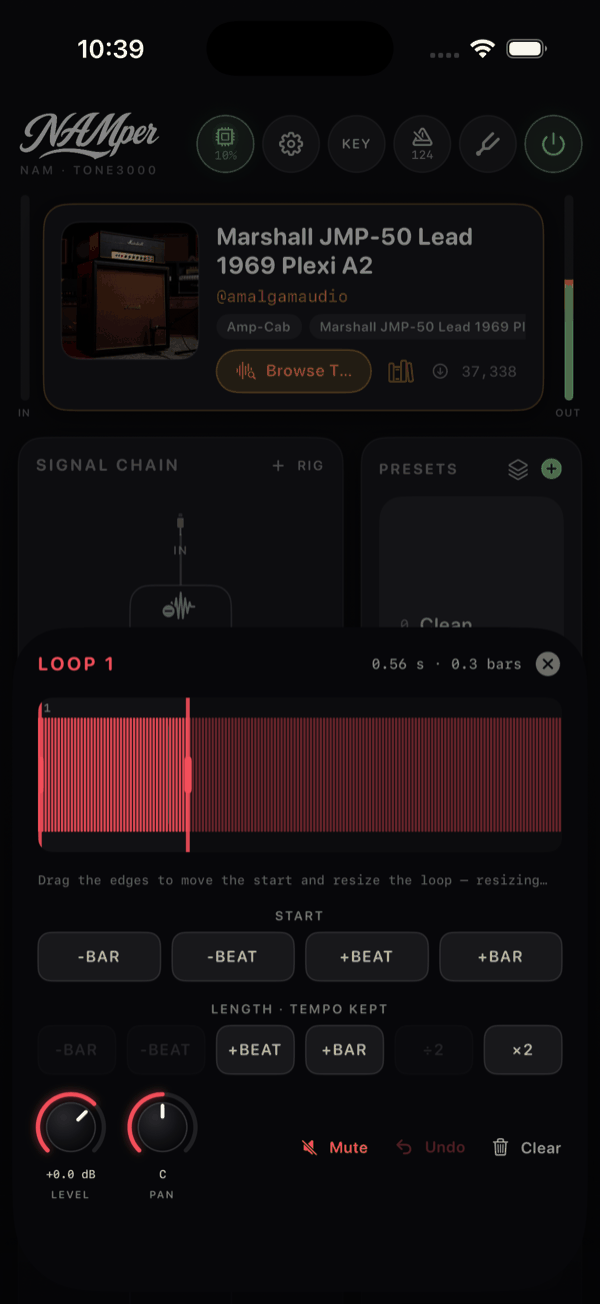
The label reads something like 8.00 s · 4.0 bars. Dragging the end handle adds the tempo that length would produce; dragging the start changes it to start +0.50 beats.
The waveform and the ruler
The waveform carries a bar and beat grid — beat ticks and numbered bar lines, anchored at the loop start, and a line on every step of the cell's grid when it is on. Audio past the loop end is drawn dimmed: kept but silent, which is what lets you push the length back out again later.
- Drag the waveform to move the start in whole beats (grid steps with the grid on); the start handle moves it freely. The loop begins later and the skipped piece wraps round to the end; length and tempo do not change. This is the fix for a loop that starts half a beat early.
- The ruler under the waveform holds the loop's length as a handle: drag it and the loop grows or shrinks in beats with the tempo kept. A length past the recording is silence.
- The end handle resizes the loop and retunes the set tempo, the bar count kept — stretch the loop and the whole set slows down. It is there on the first loop, or the only one.
Any other cell's length moves in steps of the first loop — ¼, ½, ×2, ×4, ×8 — so it stays in phase: the ruler lands on those steps, and the sheet says so.
One line per setting
Under the waveform, every setting is one line: its name, its value on a chip, the choices behind a tap.
| Row | What it sets |
|---|---|
| GRID | Off, 1 bar, 1/2 … 1/16: what a hand-tapped start and close round to, and what the edges and the ruler snap to. |
| LENGTH | The length, picked outright — up to 64 bars at the set tempo on the first loop, the steps of the first loop on any other cell — and three chips: Follow tempo (the loop plays at the set tempo, its pitch kept), ÷2 and ×2. |
| PLAYBACK | The speed, ×½ to ×8, and two chips: Reverse and Play once. |
| TRANSPOSE | A key you hold and drag, like the level: a scale from −12 to +12 semitones comes up under your finger and the loop moves a semitone at a time, heard live; two quick taps put it back at 0. It is rendered from the take as recorded, so it always goes back exactly. |
| FADE | The cell's own fade length, and a chip: Fade out while the cell sounds (it stops, in time), otherwise Fade in. |
| OVERDUB DECAY | 100, 90, 75, 50 or 25 %: how much of the layers under it an overdub keeps. |
| MULTIPLY | Off, ×2, ×4 or ×8 — the take repeated into a longer loop, without destroying it. While nothing was played over the repeats they are drawn dimmed, and turning the factor down or off gives the take back exactly. After an overdub the app asks first (Turn down): what was dubbed past the first repeat goes. |
| INPUT, OUTPUT | As the IN and OUT tiles. |
| ASSIGN RIG PRESET | The preset the cell records through — see the loop's preset. |
A row's long press learns what it steps through (Next grid, Next speed…); a chip on it learns its own action. The transpose row learns on its name, since the key's press is the key's.
The foot of the sheet
The Level knob (up to +12 dB) and the Pan knob (C, L50, R50…), then the keys:
- Save to the library — this cell's take on its own into the library; the key shows a tick when it went in.
- The sampler key — To the sampler puts the take on a pad you pick; From the sampler brings a pad's sample into this cell.
- Mute, Undo (with the steps it has left) and Clear, which clears the cell and closes the sheet.
04.7MIDI cells
Set a cell's IN to Sampler pads (MIDI) and it stops recording sound: it records which pad you hit, when, and how hard, and plays the hits back through the sampler. A drum part recorded this way costs almost nothing, stays editable hit by hit, and follows whatever kit is loaded — change the kit and the same part plays the new sounds.
It records the control moves with the hits, too: a preset, a scene, a knob or the morph, as a pedal or a host made them while the cell recorded, played back as they were. A move made on the screen is not recorded, and a move alone never starts a take.
A MIDI cell draws a tick per hit on its ring instead of a wave, and its pad flashes each time the beam passes a hit. Its OUT tile becomes QNT — the pads already go wherever the sampler goes.
Quantize while you record
The QNT tile cycles OFF, 1/4, 1/8, 1/16 and 1/32. It moves what is printed, never what you hear: the hit you play always sounds at once, and what lands on the grid is the recorded copy.
The MIDI editor
The editor of a MIDI cell has a pink MIDI badge and, in place of the waveform, a roll: one row per pad the kit has loaded, one column per grid step, heavier lines on beats and bars, a red line for the playhead. The take always fills the roll's width; a finer grid only draws more lines.
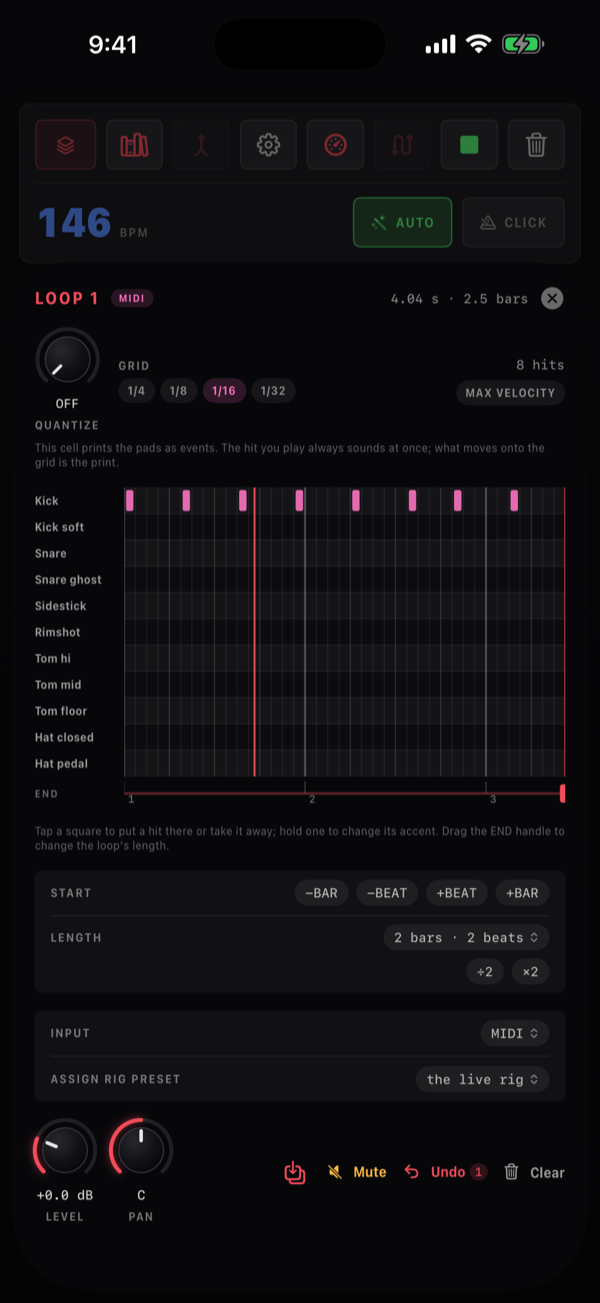
- Tap a square to put a hit there or take it away — you hear the pad.
- Hold a square to change its accent: full, two thirds, one third. The shade of the block shows it.
- Drag the red END handle on the ruler under the roll to change the loop's length in steps; the tempo stays.
Above the roll, the Quantize knob and the GRID chips (1/4 to 1/32) quantize the take after the fact — and without destroying it. The take as you played it is kept, and the grid is always applied to that original, never to the last result: turn the knob down and the hits walk back to where you played them; at OFF the timing is yours again. Try 1/8 and 1/16 against each other as often as you like. An edit by hand in the roll becomes the new played take. The row also counts the take — 8 hits — and MAX VELOCITY plays every hit at full velocity, whatever it was played at.
Under the roll, START moves the take by -BAR, -BEAT, +BEAT and +BAR, and LENGTH works as on an audio cell.
With no kit loaded the roll says Load a kit on the Sample tab to edit this take on a grid.
04.8Undo and clear
Undo always belongs to a cell. Each cell's Undo corner — and the Undo key in its editor — steps back one layer per tap: first the overdub going on now, then the layers on top of the take one by one, then the take itself: at L1 an undo clears the cell. It never goes forward again. The key is live as soon as the cell holds a take. The editor's key shows how many steps are left, the take counted among them — a take with two overdubs shows 3 — and the cell's centre shows the layer it is on (L3, L2…). Taps faster than the screen each count. On a MIDI cell undo takes back its last overdub.
There is no undo in the transport any more, and no MIDI action for "undo whatever was last": a pedal undoes a named cell (Loop 1 · Undo…). Clearing is separate. The editor's Clear empties one cell at once; the trash key, Clear all loops, empties the looper.
04.9A cell's settings
The tiles next to each pad are the cell's settings; each shows a small tag and its value. IN and OUT decide where the loop's sound comes from and goes to, LEN and DUB how long and how many passes; a PRESET tile appears when the cell has a preset of its own; the edit tile opens the loop editor, and the speaker is the cell's level.
IN
The IN menu offers Post FX (the rig) — the processed guitar, which is what you usually want. With several rigs it becomes Post FX · <rig name> per rig and the tile reads FX · <rig>. Below that, one entry per hardware input channel under its own name — a dry vocal or a second player straight off the interface — and Sampler pads (MIDI), tile MIDI, which makes it a MIDI cell.
Only this loop · <rig> gives a rig to the looper alone: that rig is taken out of what you hear live, and while a cell recording it is armed, recording or overdubbing, it is the one live rig heard — the others fall silent for the take and come back after it. Build a rig just for a loop part — a bass octave, a pad sound — and it never leaks into your playing. The tile reads Only · <rig>.
OUT
The OUT menu offers Main mix (tile MAIN), one entry per extra hardware output pair — Out 3/4, Out 5/6 and so on, which need Use all interface outputs switched on in Settings — and Into <rig name>.
That last one is the interesting one: rather than going straight to the mix, the loop plays into that rig, so the rig's effects process it live. Loop a clean part, send it into a rig with a delay and a filter, and sweep the filter while the loop runs. A rig the cell records from is not offered — that would be a feedback path.
LEN and DUB
A tap on the LEN tile steps FREE, then 1, 2, 4, 8, 16, 32 and 64 bars (4 BAR…), and the take is fixed to that many bars of the set tempo. A long press lists every choice: FREE, every bar count from 1 to 64 under Bars, and Of the first loop — ×¼, ×½, ×2, ×4, ×8 of the first loop, which need no tempo at all. A FREE take, once closed, shows what it came out as: AUTO · 4. A length that would not divide the cycle snaps to the nearest step of the first loop.
The DUB tile cycles 0, 1, 2 and 4 automatic overdub passes — the cell drops back to playing by itself after that many laps.
The level key
The speaker is the cell's level: filled from the left in the cell's colour as far as the level is loud — 0 dB fills about half — and struck through at silence. Hold it and the cell's fader comes up with its cap under your finger; drag up or down to set the level, heard as you go; let go and the fader is gone — a tap leaves it up a moment, long enough to read. Two quick taps put the level back at 0 dB. Levels go up to +12 dB, as every level in the app does. Nothing else opens while you hold it; the level's MIDI learn is on the editor's Level knob. On a CC the level follows the faders' dB scale: CC 0 is silence, 0 dB sits near CC 106, the top is +12 dB.
The loop's preset
A cell can record through a sound of its own, apart from its input. The editor's ASSIGN RIG PRESET row offers The live rig (the default: play whatever is on), Scene A of the live rig to D, and Choose a preset… — the staged song's own presets first, then every bank, with categories and search. Once the cell has one, its PRESET tile opens the same picker.
The preset goes on when the cell starts recording, starts an overdub or is armed, and when the take is done the rig you had comes back — unless you picked another preset in the meantime, which then stays. Record a rhythm part on a clean preset and solo over it on your lead sound without touching a thing.
04.10The library and what gets saved
Two things keep loops, and they keep different things.
The presets key opens Looper Presets, and they hold the setup: each cell's settings — IN, OUT, LEN, DUB, pan, its preset, quantize, speed, reverse, fade, transpose and the rest — plus the AUTO flag, and the takes of MIDI cells, which are small. A template you recall at the start of a song; audio takes stay out.
The library
The library key (the books) opens LOOPS, which keeps loops with their audio. Save the loop saves the looper as it stands — every take, the cells' settings, the levels and the tempo — under the name you type (or Loop 1, Loop 2…); the editor's Save to the library saves one cell's take. Each saved loop shows its date, length, tempo and how many cells it holds.
Tap a saved loop for its menu:
- Load into Loop 1…Loop 4 — its takes mixed as they were heard into the cell you pick; the other cells stay.
- Every loop, as saved — it replaces what the looper holds (it asks first when the looper holds anything): settings, tempo, levels and takes.
- Rename, Share…, Export as WAV… and Delete.
Each saved loop also has a preview key, Preview the loop, with a ring for its progress: the takes, mixed at their levels, loop beside the engine while the cells and the transport are left alone. One preview plays at a time; it stops when the sheet closes, when another starts, or when the loop is loaded.
Loops as files
The two keys at the foot of the library act on the library itself. Import (Import into the library) takes NAMper loops and audio files; each comes in as a saved loop, to be loaded into a cell from the list. An audio file brings its tempo when its name says one — Loop 2 - 96.5 BPM, what an export is called. Export (Export the library) sends the loops shown — all of them, or what the search found — As NAMper loops or As WAV files: each take its own file, named after the loop, the cell and its tempo, ready to drop into a DAW.
Settings → Stage → LOOPER shows how many loops are saved and what they take.
A looper preset never holds recorded audio — only a MIDI take of the pads travels inside it. To keep a loop, save it to the library; to keep a whole performance, use the recorder on the Mix tab, which records the output mix (without the click) plus a separate dry input stem.
04.11Songs, the room and the clock
Song sections
There is no song mode in the looper: a song's arrangement lives in its automation on the Perform tab, which has a looper lane — record, arm, mute, solo, play and stop a cell, undo, fades and the swap. A cell the song's automation starts comes in from its top on the next bar line: a section. A cell you start by hand comes in mid-cycle, in time, as always. Keep one cell playing under the sections and it is the bed of a band arrangement.
Echo cancelling
A phone's mic in the room hears what the app plays — the loops, the pads, the backing track and the click — and a new layer would record them again: mud at best, at worst a loop that builds on itself. Echo cancelling, off by default — switch it on when the phone's own mic hears the room — takes that echo out of what a recording, overdubbing or armed cell writes, and nowhere else: what you hear live is never touched and gains no latency. It learns the room whenever loops play, so it is ready before you arm a cell; with no echo at the mic the take is exactly the input. The switch is in Settings → Audio and in the transport's gear.
MIDI clock
Settings → Control → MIDI clock sets the clock both ways. Follow a MIDI clock makes the clock's tempo the set's — above a song, a loop or your hand — and an armed cell starts recording on its next downbeat; pick the source and an offset for a sender that runs early or late. A running loop keeps its bar lines on the clock's through a long set: a millisecond of drift is taken back a sample at a time, too little to hear. The sender's Stop stops the song, the loops and the click. Send MIDI clock sends 24 ticks a beat to the destination you pick, off the audio clock the click runs on: start goes out on the loop's top, stop when it stops.
Besides the connected devices, the destination can be NAMper (other apps) — a clock source a drum machine or synth app on the same device picks — or the Network session: a Mac on the same Wi-Fi connects to the phone in Audio MIDI Setup → MIDI Network Setup, and the phone is listed there only while the session is picked. On the iPhone and iPad the network session can be the clock's source too; on Android the network carries the clock out only.